

Google Slides lets you crop an image into a circle using the built-in Mask Image tool. This process takes under a minute and requires no external editing software. This guide explains how to make an image a circle in Google Slides in simple steps. It also covers how to resize a circular image and how to undo the circle mask if needed.
Quick Answer
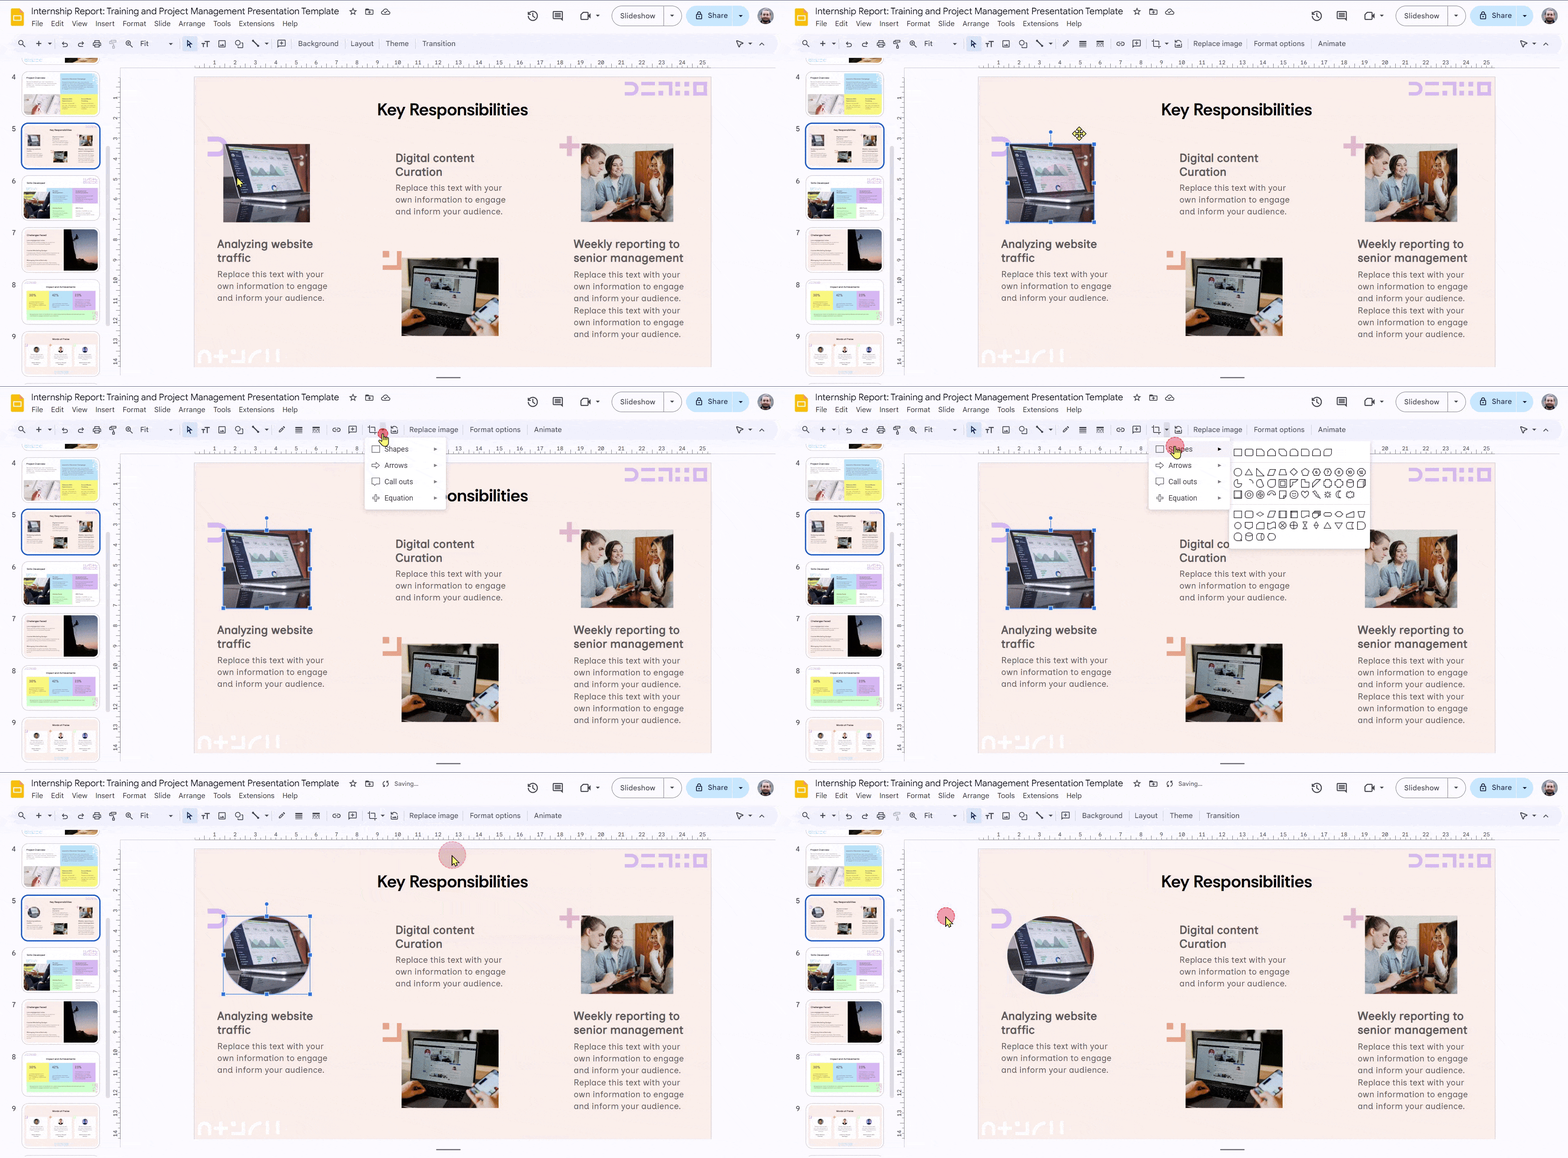
To make an image a circle in Google Slides, click the image to select it, then click the small down-arrow next to the Crop icon in the toolbar. Choose Mask Image, then select Circle under the shapes category. Google Slides will instantly crop your image into a circular shape, no design software needed.
How to Make an Image Circular in Google Slides?
Step 1: Insert Your Image
Open your slide and go to Insert > Image, then choose to upload from your device, Google Drive, or a web search. Place the image anywhere on the slide; you’ll reposition it after cropping.
Step 2: Select the Image
Click once on the image to select it. A blue border with resize handles will appear around it, confirming it’s active and ready to edit.
Step 3: Open the Crop Tool
Click the Crop icon in the toolbar, or use the keyboard shortcut Ctrl+Shift+F (Windows) or Cmd+Shift+F (Mac). This switches the image into crop mode.
Step 4: Choose the Circle Shape
Click the small dropdown arrow next to the Crop icon. Under Shapes, select the Oval icon. Google Slides will preview a circular crop mask over your image.
Step 5: Adjust to a Perfect Circle
Drag the crop handles inward while holding Shift. Holding Shift locks the aspect ratio to 1:1, which keeps the crop perfectly round instead of oval.
Step 6: Position the Crop Frame
Before finalizing, drag the crop frame over the part of the image you want inside the circle. This matters most for photos where the subject isn’t centered.
Step 7: Apply the Crop
Press Enter, or click anywhere outside the image, to lock in the circular crop. The image now displays only within the circular frame.
Step 8: Resize and Reposition
Click and drag the image to place it where you want on the slide. Use the corner handles to resize it while keeping the circular shape intact.
Step 9 (Optional): Add a Border
With the image selected, click the Border color icon in the toolbar and choose a color and weight. This adds a clean outline around the circular image, useful for headshots or logo treatments.
Browse presentation templates with modern layouts and image-friendly designs for Google Slides.
Additional Tips:
- Feel free to adjust the size and position of your circular image after applying the mask. You can do this by clicking and dragging the image on the slide.
- Remember, if you ever want to remove the circular mask and return your image to its original form, simply follow steps 2 and 3 again. Instead of choosing a shape from the “Mask Image” menu, this time select “None.”
Closing Thoughts
With just a few clicks, you can transform your ordinary images into circles, adding a touch of creativity and visual interest to your Google Slides presentations. This simple technique is a great way to grab your audience’s attention and leave a lasting impression. So next time you’re building a presentation, don’t be afraid to experiment with image shapes and let your creativity flow!
Create beautifully designed presentations with perfectly styled images using an AI presentation generator.
Create AI presentations directly in Google Slides.
- No design skills required
- 3 presentations/month free
- Save directly in Google Slides

Frequently Asked Questions Related to Making an Image a Circle in Google Slides
1. Can I crop my image into shapes other than circles?
Absolutely! While there’s no direct crop-to-shapes option, Google Slides offers “Mask image” which allows you to use various shapes like squares, stars, and even custom callouts. Pick the one that complements your image best.
2. After masking, can I adjust the size of the shape?
Yes! Even after masking with a circle, you can resize it. Simply click and drag the corner handles of the image. This adjusts the size while maintaining the circular shape.
3. Can any image in Google Slides be shaped differently?
Yes, you can modify the shape of any image you insert into your presentation. Google Slides offers various masking options.
4. Is there a way to undo the shape change?
Yes, reverting an image to its original form is easy. In the “Format options” panel, under the “Image shape” dropdown, select “Original image”.
5. Do these shape changes affect the image quality?
No, thankfully, changing the shape of an image in Google Slides doesn’t impact its quality or resolution. The image remains crisp and clear.
6. Can I use different shapes on various parts of a single image?
Currently, Google Slides only allows applying one shape to the entire image. If you need more intricate edits, consider using image editing software before inserting the image into your presentation.
7. How do I make an image a circle in Google Slides on mobile?
Open your presentation in the Google Slides app and tap the image you want to edit. Select Crop Image → Mask Image, then choose the circle shape. Adjust the image within the circle as needed, then tap elsewhere on the slide to apply the changes.
8. Why can’t I find the Mask Image option in Google Slides mobile?
Make sure you have selected an image first. The Mask Image option appears under Crop Image when an image is selected. If you still don’t see it, check that you’re using the latest Google Slides app and try reopening the presentation.
9. Can I animate an image cropped to shape in Google Slides?
Yes. A cropped or masked image can be animated like other images in Google Slides. However, you need to use Google Slides on a computer to add or edit animations, as animation editing isn’t available in the mobile app.