Sometimes, a picture needs a quick adjustment to fit your Google Slides presentation perfectly. Flipping images horizontally or vertically can help create mirror effects, balance your slide layout, or simply make your presentation look more polished. In this step-by-step guide, you’ll learn how to flip an image in Google Slides quickly and easily, ensuring your slides look professional, engaging, and visually appealing
Step-by-Step: How to Flip an Image in Google Slides
Learning how to flip an image in Google Slides only takes a few clicks. You can flip pictures either horizontally or vertically, depending on the effect you want. Follow these steps to get it done quickly.
Method-1 Using Format Options
Step 1: Select the Image
- Click on the image you want to flip.
- You’ll see a blue border with adjustment handles. This means the image is selected and ready to be edited.
Step 2: Access the Format Options
- With the image selected, go to the top menu and click on Format.
- From the dropdown, choose Format options.
- A panel will open on the right side of your screen with more editing tools.
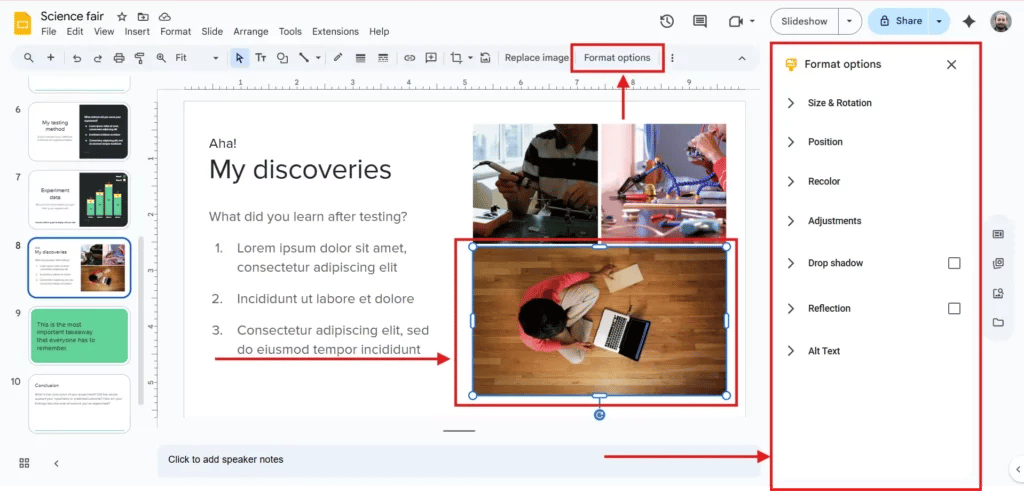
Step 3: Flip the Image Horizontally or Vertically
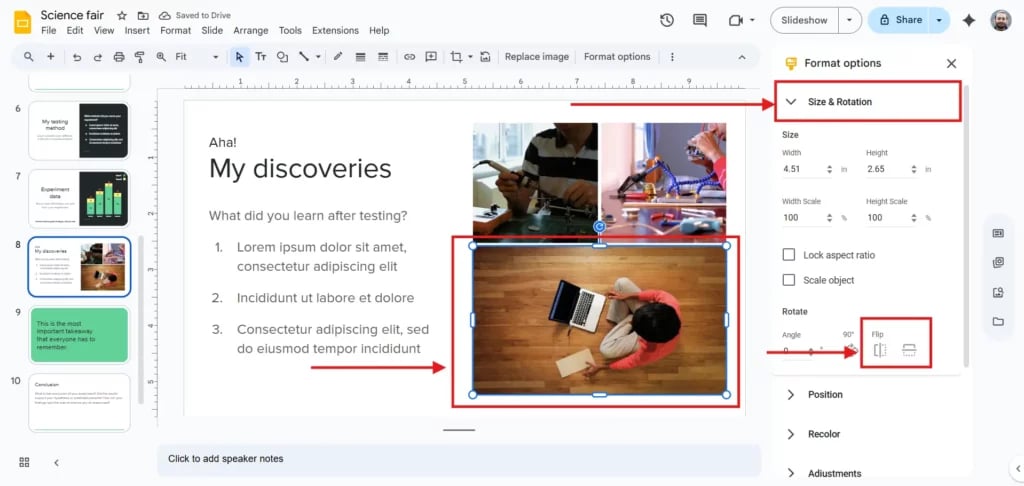
- In the Format options panel on the right, go to Size & Rotation.
- Under the Flip section, you’ll see two icons:
- Vertical Flip: flips the image upside down.
- Horizontal Flip: flips the image from left to right (like a mirror).
- Click on the option you need, and your image will instantly flip.
Step 4: Preview and Confirm
- After flipping the image, take a moment to check the preview on your slide.
- Make sure the orientation looks correct and matches what you need (horizontal mirror or vertical flip).
- If it doesn’t look right, simply go back to the Flip options and choose the other direction.
- Once you’re happy with the result, your flipped image is ready to use in your presentation.
Method 2: Flip the Image Using Your Mouse Cursor
This quick and clever trick lets you mirror an image in Google Slides directly, no extra panels or menus needed.
Step 1: Copy and Paste the Image (Optional)
- If your image isn’t already on the slide, copy it (Ctrl + C) and paste it into your Google Slides presentation (Ctrl + V).
- If it’s already there, go straight to the next step.
Step 2: Select and Drag the Image
- Click on the image to select it. You’ll see small blue squares (handles) around its border.
- Click on one of the blue corner handles and drag it in the opposite direction, for example, drag the left handle toward the right side.
Step 3: Release to Flip
- The image outline will follow your cursor. When you’ve moved it far enough, release the mouse button. The image will “flip” automatically, either horizontally or vertically, depending on the handle direction.
Step 4: Quick and Easy
- This method is fast and doesn’t require using the menu; just drag and drop to mirror your image instantly.

Learning how to flip images in Google Slides is a simple but powerful trick to enhance your presentation design. Whether you use Format Options for precision or the Mouse Cursor method for speed, mastering this technique helps you create polished, professional slides with ease. Start flipping your images today and make your Google Slides presentations stand out with creativity and style.
Create Presentations Easily in Google Slides and PowerPoint
- No design skills required
- 3 presentations/month free
- Don't need to learn a new software

FAQs
1. How to flip an image in Google Slides vertically?
You have to simply select your image, go to Arrange > Rotate > Flip vertically, and it will turn upside down. This option is handy when you want to quickly mirror graphics or adjust the orientation for better slide design.
2. Why can’t I find the flip option in Google Slides?
The flip feature only shows when an object is highlighted. Ensure you’ve selected the image or shape first, then navigate to Arrange > Rotate. If nothing is selected, the flip option will remain hidden in the menu.
3. Can I flip multiple images at the same time in Google Slides?
Yes, you can. Hold the Shift key while clicking on each image to select multiple items. Once selected, go to Arrange > Rotate > Flip, and all chosen images will flip together, saving time and effort.