Picture this — you’re working on a PowerPoint presentation for your quarterly marketing meeting. You’ve got a bunch of pictures, statistics, and text to put together. But It’s all a bit overwhelming, right?
When you create presentation slides, the most important thing is to get your audience glued to your message and eliminate distractions. One simple yet effective method of capturing attention is emphasizing the particular areas you’re discussing, especially in complex or crowded images.
But how to do that?
Read our guide on how to highlight a picture in PowerPoint so that you can turn your ordinary images into some extraordinary story-telling tools.

Read Related – How to Crop an Image in PowerPoint
Step-by-Step Guide: How to Highlight a Picture in PowerPoint
To highlight a picture in PowerPoint, there are three methods you can follow. Let’s jump in:
Method 1 – Highlight by adding a border
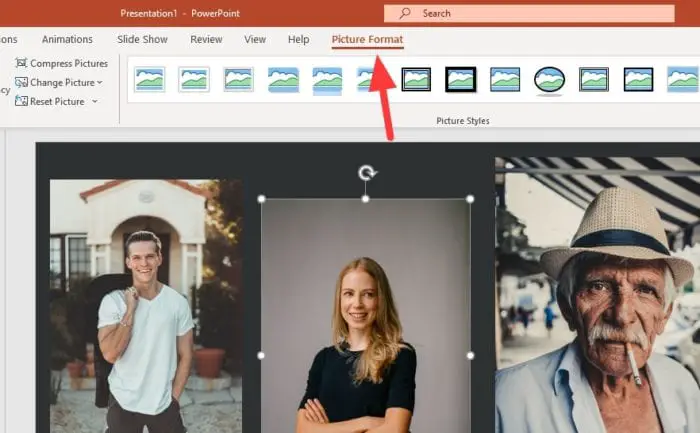
Step 1 – Select the picture you want to highlight.

Step 2 – Select ‘Picture Format.’
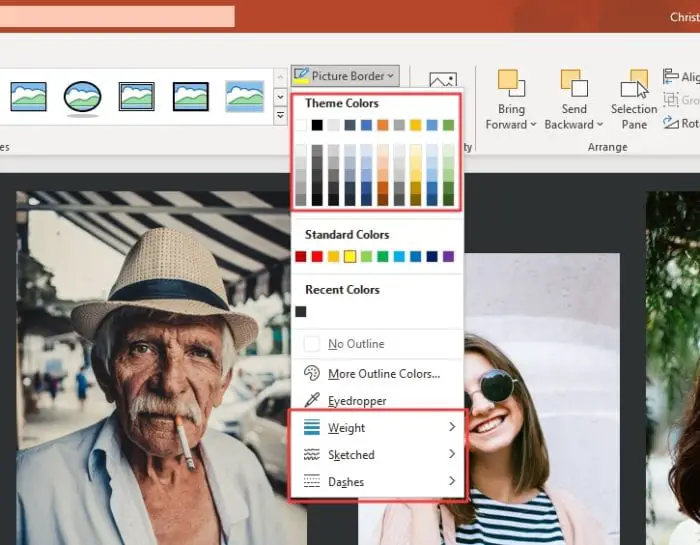
Step 3 – Go to Picture Border and adjust the Color, Weight, Sketches, and Dashes.
And here’s the final result…

Method 2 – Make other elements darker
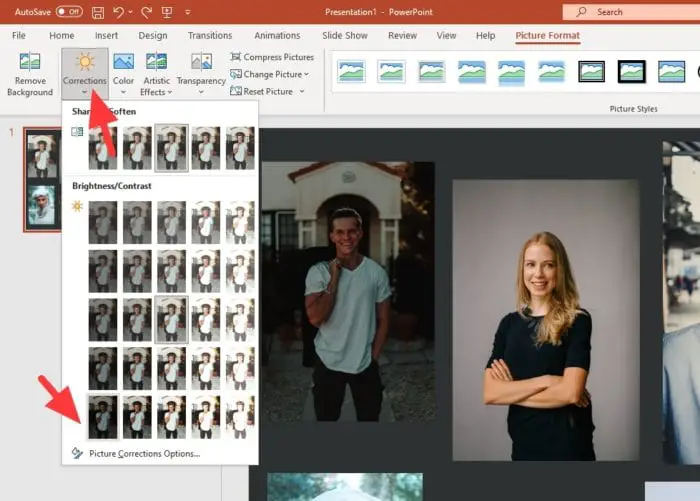
Step 1 – Select the picture you want to highlight and go to the ‘Picture Format’ option.

Step 2 – Go to ‘Corrections’ and adjust the brightness to the lowest mode.
Step 3 – Repeat the same step for all the elements in your slide, except for the one you want to highlight.
The result would look like –

Method 3 – Highlight your image by turning all other elements black and white
Step 1 – Select all the elements you don’t want to highlight in your slide.

Step 2 – Go to Picture Format > Color > Grayscale. Choose any effect you want (Here, I have taken standard grey).
Step 3 – Apply the same, and your result will look like this –

Method 4 – Use the Morph transition for a spotlight effect
If you want to add a smooth animation while drawing attention to a specific part of an image, the Morph transition is a great option. This method creates a spotlight-style effect that works especially well for live presentations and visual storytelling.
Follow these steps to highlight a picture in PowerPoint using the Morph transition:
Step 1 – Duplicate the picture
Start by selecting the picture you want to highlight on your slide.
Press Ctrl + C to copy the image, then press Ctrl + V to paste it on the same slide.
Place the duplicated picture exactly on top of the original image.
Duplicate the picture on the same slide
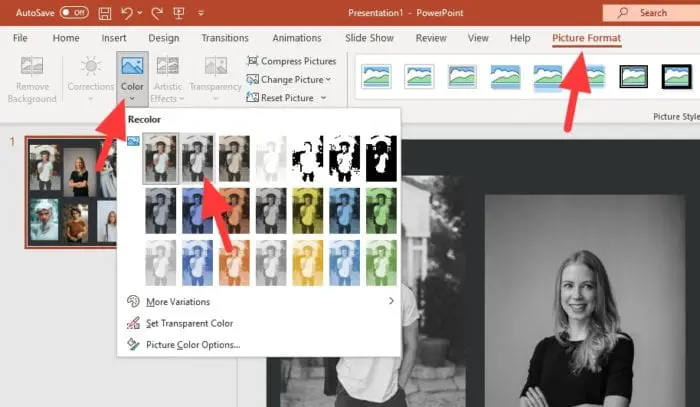
Step 2 – Convert the background image to black and white
Select the original image (the one at the back).
Go to Picture Format > Color > Recolor and choose Black and White or Grayscale.
This will make the background image less prominent.
Go to Picture Format > Color > Recolor > Black and White
Step 3 – Crop the duplicated image into a circle
Now select the duplicated image on top.
Go to Picture Format > Crop > Crop to Shape and choose Oval.
Adjust the crop handles to form a clean circular shape.
Crop > Crop to Shape > Oval
Step 4 – Adjust the spotlight area
Drag the circular image to the area you want to highlight.
Resize it if needed so the spotlight focuses clearly on the important section of the picture.
Adjust the circular crop to highlight the desired area
Step 5 – Duplicate the slide for the animation
Right-click on the slide and select Duplicate Slide.
This step is necessary to create the smooth animation effect.
Duplicate the slide
Step 6 – Apply the Morph transition
Select the first slide, then go to the Transitions tab.
Choose Morph from the transition options.
When you play the slideshow, PowerPoint will smoothly animate the spotlight effect from the full image to the highlighted area.
Go to Transitions > Morph
Read Related – How to Format a Picture in PowerPoint
How to Highlight or Circle Specific Parts of a Picture in PowerPoint?
You might have seen slides highlighting specific portions, like facts or statistics. It is a great way to concentrate your audience to the desired portion you want them to look at. The great news is it is quite an easy technique to follow.
Let’s look at how to highlight part of a picture in PowerPoint –
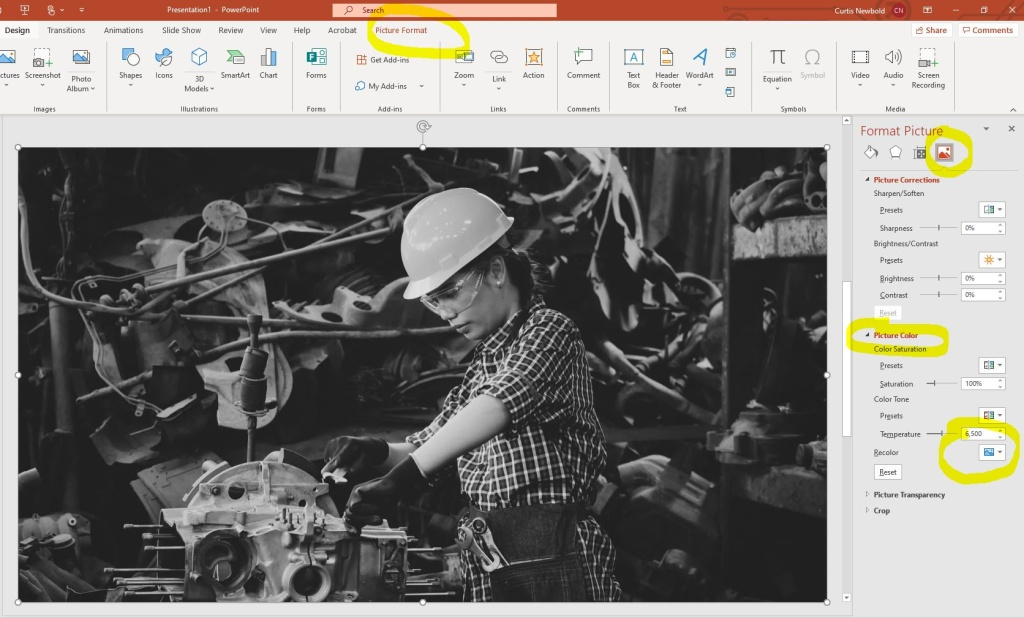
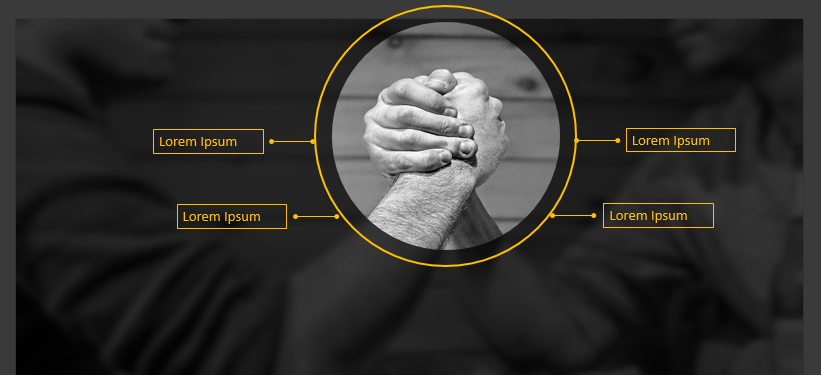
Step 1 – Select the picture you want from your computer

Step 2 – Turn the picture black and white. Click “Format Picture”, then select the “Picture” icon at the top. Next, go to “Picture Color” and choose “Recolor”. Pick the option “Grayscale”.
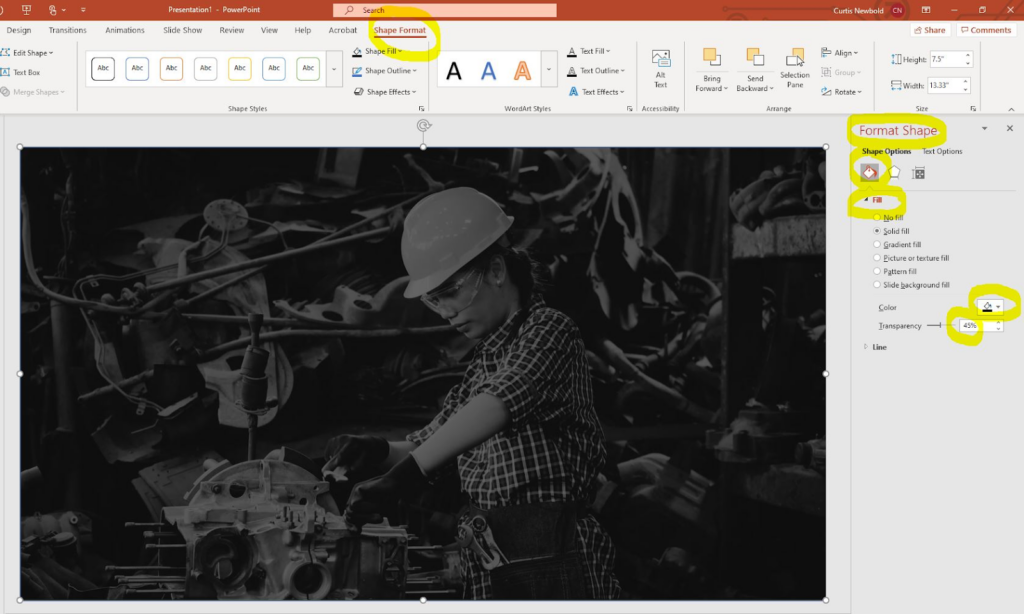
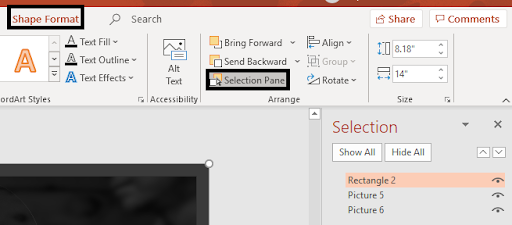
Step 3 – Make the image darker. To add a rectangle shape, Click Insert > Shapes, draw it over the image matching the size, right-click the shape, and choose “Format Shape”. Set the color to black, and adjust transparency for desired darkness.
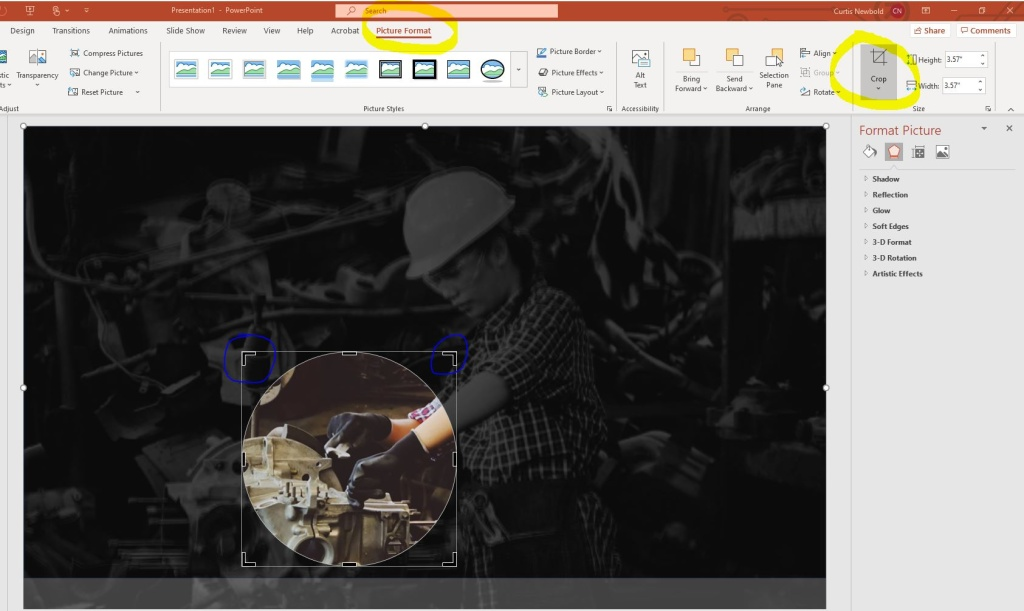
Step 4 – Re-enter the original picture (colored)

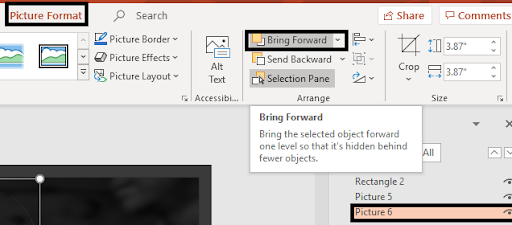
Step 5 – Cut and Crop the portion you want to highlight. Choose your shape. Right-click on the top image and choose “Format Picture”. Next, select “Crop” > “Aspect Ratio” > to create a perfect circle. Then, choose “Crop” > “Crop to Shape” > “Oval”.

Step 6 – To highlight a specific portion of the image, crop it and adjust its shape. Click on the circled image, then choose the “Fill and Line” icon under “Format Picture” on the right side. Customize it by selecting a solid line with a dark yellow color and a stroke.
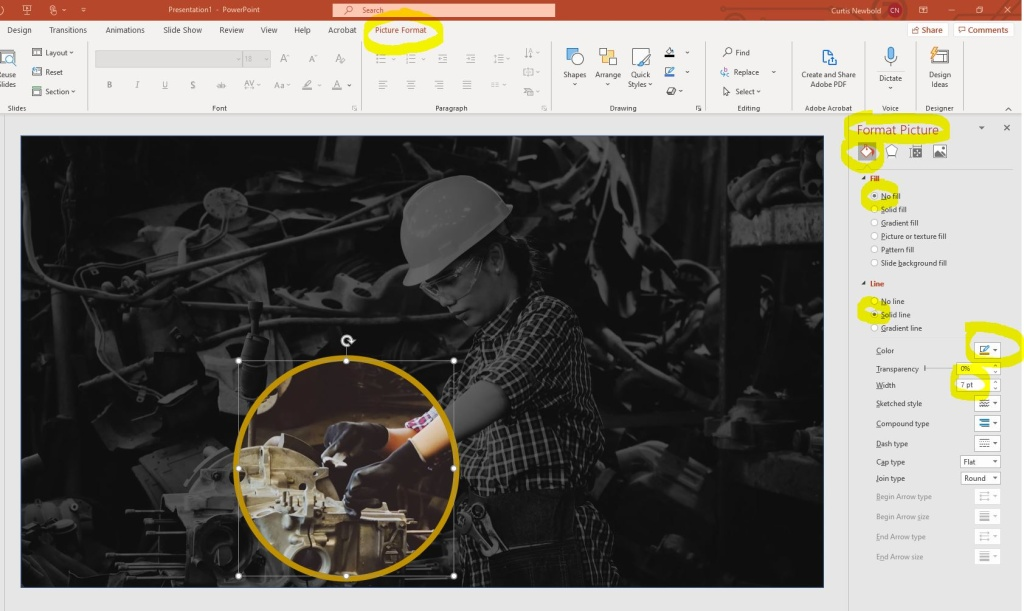
Step 7 – Add any further texts to amplify the slide.

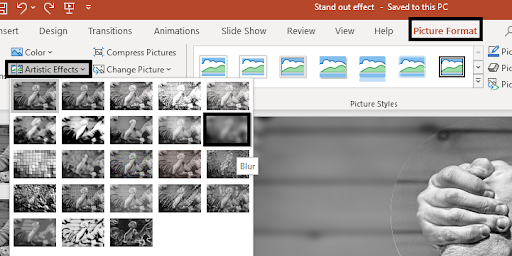
There’s another way to highlight parts of your picture by directly selecting a part of the picture. Let’s look at how to highlight or circle a picture in PowerPoint:
Step 1 – Select the picture.

Step 2 – Insert a circular shape and adjust its shape and size.
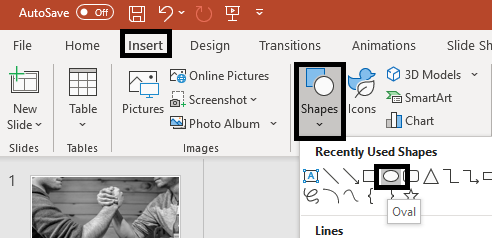

Step 3 – Fragment and Merge the Image and the Shape. To select the entire image, press CNTRL and click on the circle. Then, go to the Format tab and choose Merge Shapes. Finally, select Fragment from the options in the dialog box.
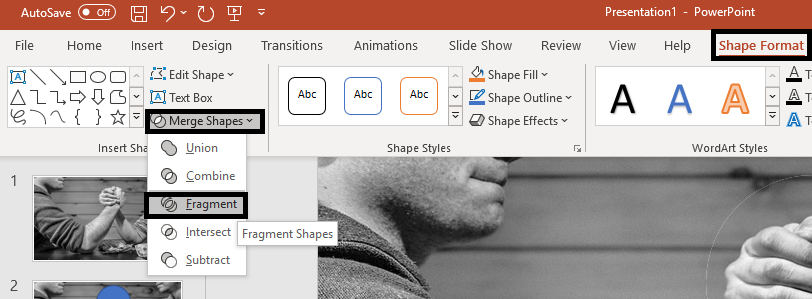
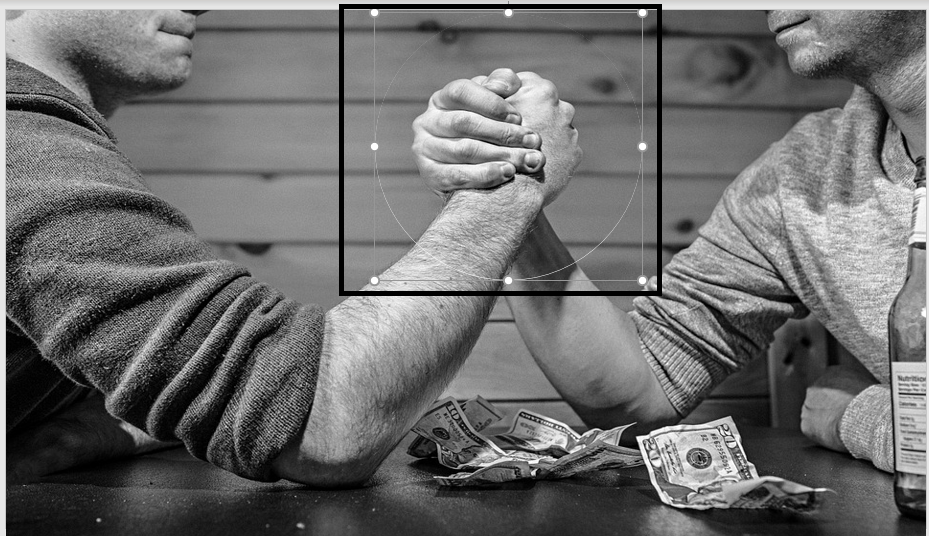
Step 4 – Blur the rest of the picture. Go to Picture Format> Artistic Effects and choose the blur effect.

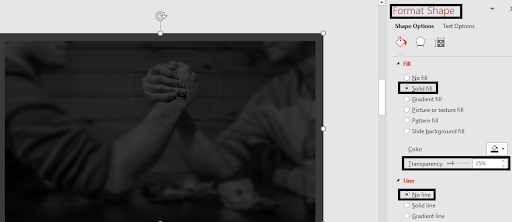
Step 5 – Add a transparent layer. To create a rectangular shape, go to Insert > Shapes > Rectangle and cover the canvas. Right-click on the shape and choose Format Shape, then select Line > No Line from the Format Shape dialog box. Apply a solid black fill, increasing the transparency to 25%.
And here’s the final look –

Still manually adjusting every image and slide? Let SlidesAI AI PPT Maker handle the design so you can focus on your message instead of formatting
Highlighting Text in a Picture: Techniques and Tools in PowerPoint
In addition to highlighting portions of your picture, you can add and highlight texts. So how to highlight text in a picture in PowerPoint?
Let’s have a look!
Follow any of the above methods to highlight a picture or a part of it. Then, follow the next steps.
Step 1 – Outline the highlighted part. And add the texts. Now, evenly distribute it in the slide. Adjust the color, width, and transparency. The result will look like –
Here are all the in-depth methods you can use to highlight your choice of pictures in PowerPoint.
Are you still looking for fun ways to hype up your presentation game?
Whether it is preparing for a long ‘formal’ presentation or an artistic one, or adding stunning AI-generated images, the smart AI tool SlidesAI can help you do anything!
By working as a powerful extension, SlidesAI allows you to enhance your content for maximum impact with minimal effort. You can focus on the crucial aspects, include relevant information, and easily ensure comprehensive coverage. SlidesAI’s design capabilities offer recommendations on layouts, color schemes, and formatting options that perfectly align with the presentation’s subject. SlidesAI Also offers pre-designed templates which custs off your time in manually designing the slides.
Get started now and create unique presentations with SlidesAI!
Build Stunning Slides in Seconds with AI
- No design skills required
- 3 presentations/month free
- Don't need to learn a new software

Frequently Asked Questions About Highlighting Picture in PowerPoint
How do you highlight an object in PowerPoint?
First, select the object you want to highlight. Then, go to the “Format” tab in the top menu and click on “Shape Fill”. Select the highlight color of your preference from the dropdown, and you are done!
How do I select highlighter in PowerPoint?
Open your desired slide and click on the “Home” button from the main menu. Click on the “Text Highlight Color” button from the “Font” section. Next, choose your desired highlight color from the drop-down menu. Lastly, click and drag over the text you want to highlight in your presentation.
How do you shade a picture in PowerPoint?
To shade a picture in PowerPoint, select the desired picture, go to the “Format” tab, and click on the “Color” drop-down menu in the “Adjust” group. Next, choose the desired shading effect from the given presets, and you’re done!