
Creating clear and visually engaging presentations is an important part of getting your message across in PowerPoint. Images can be a powerful tool to illustrate your points, but sometimes text can crowd them or obscure important details.
While PowerPoint doesn’t have a specific function to automatically wrap text around images, there are a few easy tricks you can use to achieve a more polished and professional look for your slides.
This article will walk you through these methods, helping you to integrate text and images seamlessly for a more impactful presentation.
3 Ways to Do Powerpoint Text Wrapping
Now that we’ve established the importance of text wrapping for clear and visually engaging presentations, let’s explore some solutions! We’ll explore three different approaches to wrapping text around images in PowerPoint:
Method 1: Manually Add Spaces Around the Object
Step 1: Insert Your Image or Shape
- Click “Insert” and choose “Pictures” to browse for an image.
- Alternatively, click “Shapes” and pick your desired shape from the options. Drag on the slide to draw it.
Step 2: Position Your Text Box
- Click “Insert” again and select “Text Box.” Choose “Draw Text Box” or “Vertical Text Box” based on your needs. Drag to create a text box near your image or shape.
Step 3: Type Your Text
- Click inside the box and start typing or paste your content.
Tip: Make sure the text is visible over the image. Right-click the image and choose “Send to Back” if needed. This will bring your text to the front.
Step 4: Manually Wrap Text with Spaces:
- Estimate Text Width: Roughly guess the horizontal space you want your text to take on each side of the image/shape.
- Create a Text Buffer: Hit the spacebar key several times before typing your main content. This creates a “buffer” zone around the image.
- Type & Adjust: Start typing your text. Watch how it aligns with the image and add more spaces as needed to achieve the desired wrapping effect. You might need to go back and adjust the initial buffer zone too.
Method 2: Add Text Boxes Around the Image
Step 1: Insert Your Image: Click “Insert” > “Pictures” and choose your image file.
Step 2: Plan Your Text Placement: Decide where you want the text to appear around the image (top, bottom, sides).
Step 3: Create Text Boxes: Click “Insert” > “Text Box.” Drag and position the first text box near the image according to your plan.
Step 4: Type & Repeat: Type your text in the first box. Depending on the text length, you might need additional boxes. Repeat steps 3 and 4 to create more text boxes around the image.
Step 5: Fine-tune Positioning: Adjust the size and position of each text box to achieve the desired wrapping effect. You might need to experiment to get a visually pleasing layout.
“Want perfectly organized slides without adjusting layouts manually? Explore our presentation templates designed for clean, professional content layouts.”
Method 3: Import Wrapped Text from Microsoft Word
Step 1: Begin by opening Microsoft Word and typing your desired text.
Step 2: Insert an image by going to the ‘Insert’ tab, choosing ‘Pictures,’ then ‘This Device.’ Select your image file and click ‘Insert.’
Step 3: Right-click on the inserted image to see options, including ‘Wrap Text,’ which we’ll use.
Step 4: Hover over ‘Wrap Text’ to see different layouts and pick the one you like.
Step 5: Keep Word open and switch to PowerPoint.
Step 6: Find the slide where you want to add your Word content.
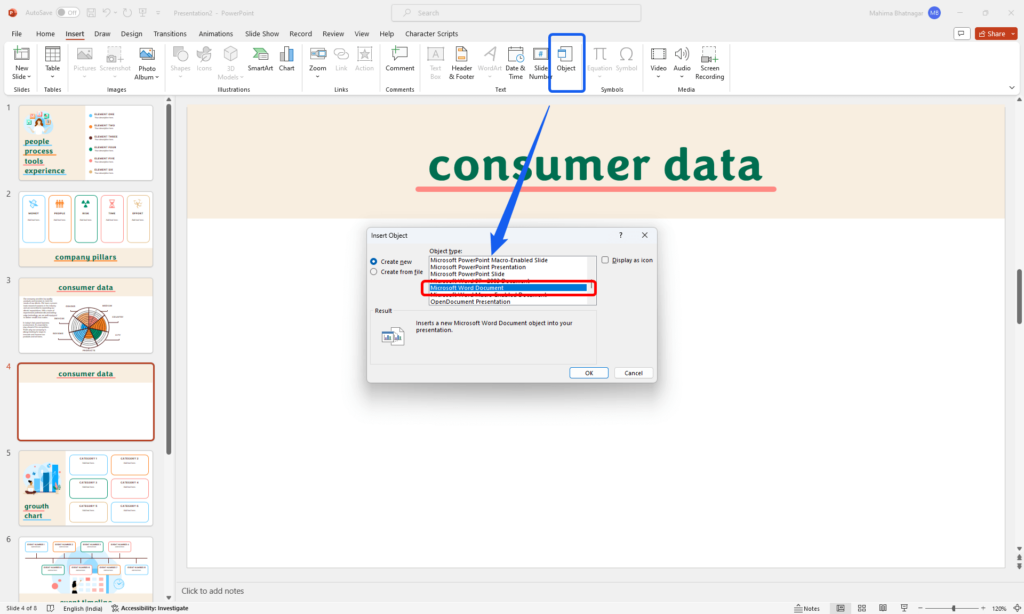
Step 7: Go to the ‘Insert’ tab and click ‘Object’ in the ‘Text’ group. A new window will pop up.
Step 8: Choose ‘Microsoft Word Document’ from the ‘Object type’ dropdown menu and click ‘OK.’ This creates a Word-like object in PowerPoint.
Step 9: Now, you can copy both the text and image from the Word document, keeping the formatting.
Step 10: Right-click on the image inside the ‘Word-inside-PowerPoint’ object on the slide.
Step 11: Use the ‘Wrap Text’ option to change how text wraps around the image.

Step 12: Another helpful feature is ‘Edit Wrap Points,’ which lets you adjust the wrapping outline using dots around the image.
Step 13: Click outside the object box to exit editing mode and return to the slide.
Step 14: To make more changes, just double-click on the object to go back to the ‘Word-in-PowerPoint’ object and edit as needed.
What Are the Benefits of Text Wrapping in PowerPoint?
1. Improved Visuals
Text wrapping blends text and images smoothly, making slides more visually appealing and grabbing the audience’s attention without overwhelming them.
2. Efficient Use of Space
Text wrapping helps avoid clutter on slides, making sure your presentation looks clean and organized, which is important for conveying your message clearly and professionally.
3. Clear Communication
Placing text strategically around images or shapes helps guide your audience’s focus, making your message easier to understand and remember.
4. Better Readability
Text wrapping reduces empty space on slides, making it easier for your audience to read and comprehend the information you’re presenting, especially when showing data in tables or charts.
5. More Content in Less Space
With text wrapping, you can fit more content onto each slide, which comes in handy when you have a lot of information to cover within a limited time.
6. Increased Flexibility
Text wrapping allows you to position text exactly where you want it, giving you more control over the layout of your slides and helping you create presentations that meet your specific needs.
7. Polished and Professional Look
By using text wrapping to create visually appealing slides that are easy to read, you can give your presentation a polished and professional appearance, helping to keep your audience engaged and focused on your message.
“Let SlidesAI handle slide design and formatting for you. Generate presentation-ready PowerPoint slides in seconds.”
Create Presentations Easily in Google Slides and PowerPoint
14M+Installs

Frequently Asked Questions Related to Wrapping Text in PowerPoint
What is text wrapping?
Text wrapping in PowerPoint refers to the process of adjusting the layout of text around an image or object. It allows you to control how text flows around the inserted element, enhancing the visual appeal and clarity of your presentation slides.
How to wrap text around a table in PowerPoint?
To wrap text around a table in PowerPoint, insert the table and right-click to access “Format Shape.” Check “Wrap text in shape” under “Text Options,” adjust margins as needed, and the text will automatically wrap around the table.
How to wrap text in a chart in PowerPoint?
To wrap text in a chart in PowerPoint, select the chart, go to “Format,” then “Text Box,” and check “Wrap text in shape.” Adjust margins for desired wrapping.
Why is text not wrapping in PowerPoint?
In PowerPoint, text may not wrap due to various factors. Ensure the text box settings allow wrapping and that the text box is wide enough. Check for overlapping objects obstructing wrapping and avoid manual line breaks. Additionally, verify that the text box properties don’t have the “Do not wrap” option selected.