You can also explore how to align text boxes in PowerPoint for even cleaner layouts.
How to Show and Use the On-Slide Ruler in PowerPoint
The on-slide ruler is a powerful drawing tool that lets you measure and align objects right on the slide surface. Here’s how to use it effectively:
- Open Your PowerPoint Presentation
Open your existing presentation or start a new one where you want to draw or adjust objects with accuracy.
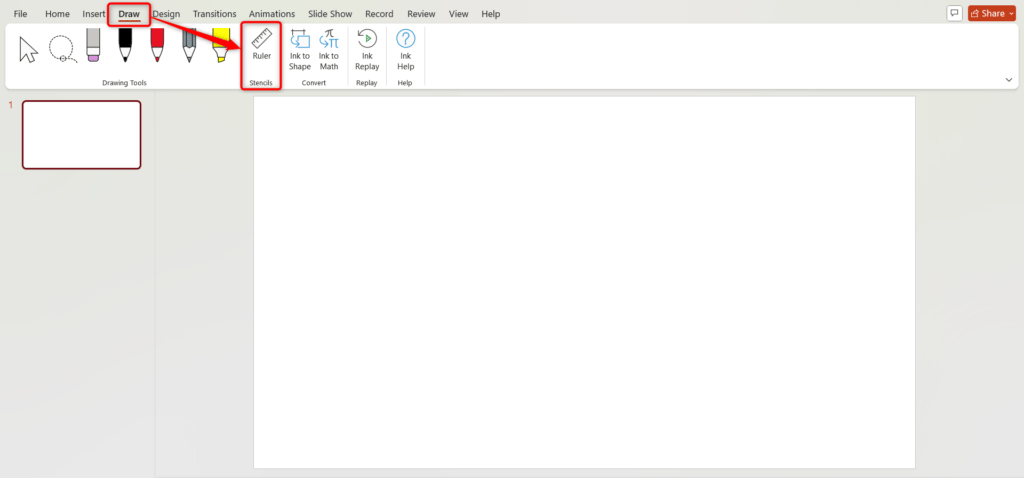
- Go to the Draw Tab in the Ribbon
Select the “Draw” tab. This is where creative tools like pens, shapes, and the ruler live.
- In the Stencils Group, “Click” on “Ruler” to Activate it
Once you click “Ruler”, a digital measuring line appears over your slide.
- Move the Ruler Across Your Slide
Click and drag it anywhere you want. It can be used horizontally, vertically, or diagonally. Perfect for the precise placement of arrows or shapes.
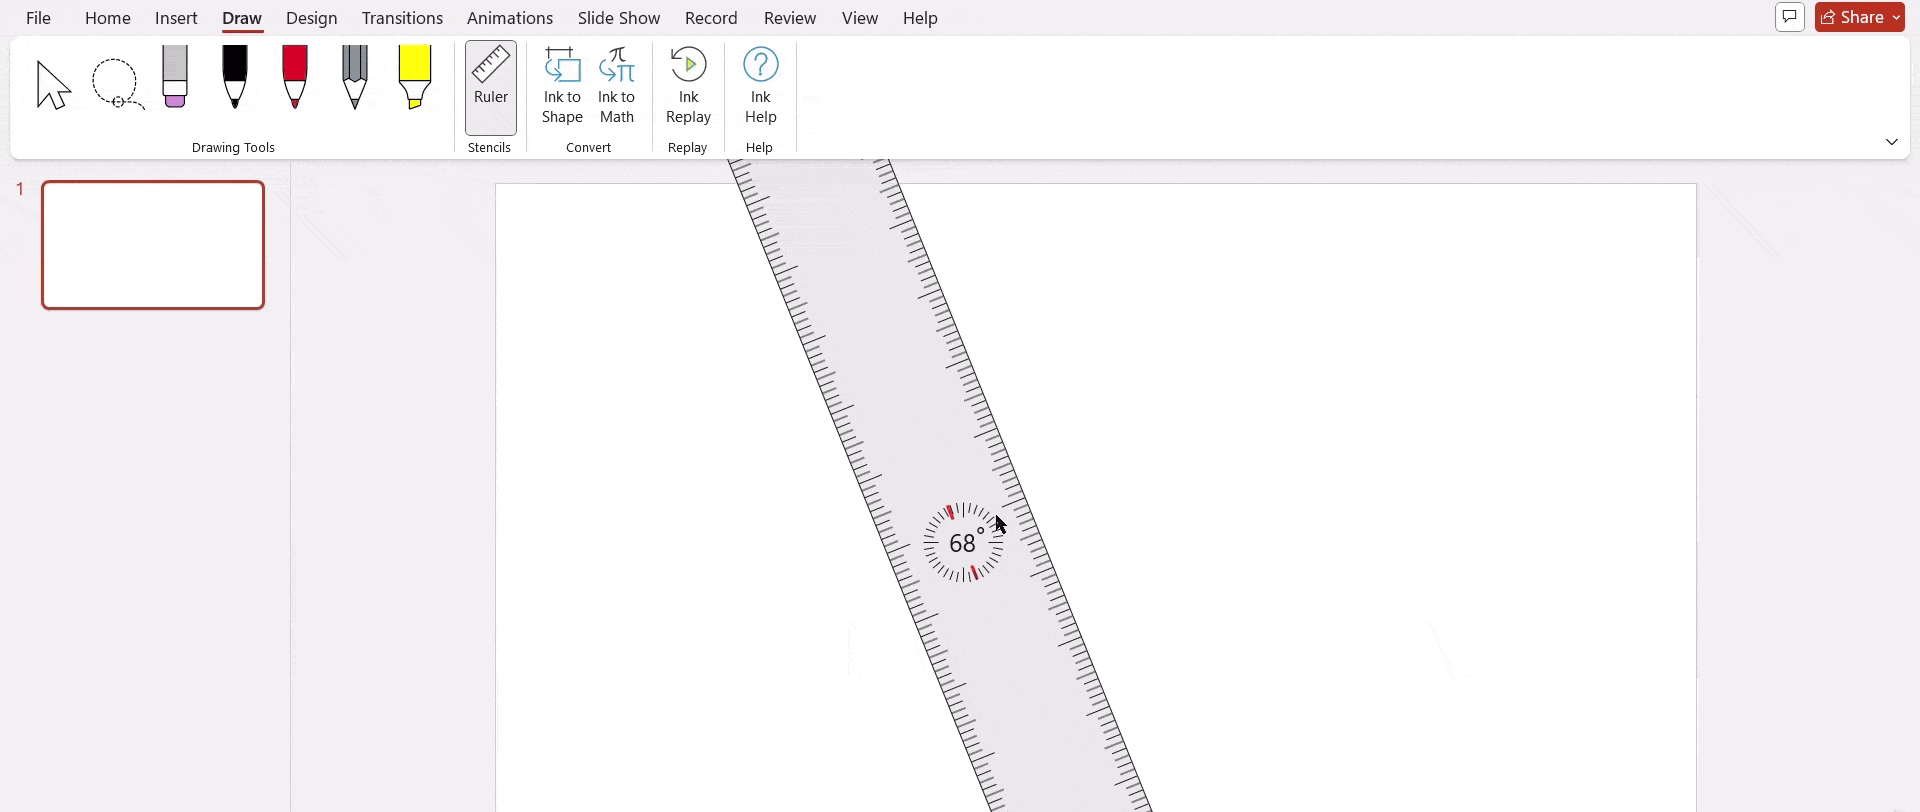
- Rotate the Ruler as Needed
Hover over it and scroll your mouse wheel up or down. You may notice a rotation angle number in the center. This makes it easy to measure or draw at specific angles.
- Align Your Elements Accurately
Use the ruler’s edge as a guide to position objects, ensuring they are perfectly aligned with other elements on the slide.
Check this guide on how to rotate the ruler in PowerPoint for more advanced control.
Why You Should Use the Ruler in PowerPoint
Even small alignment details can make or break your presentation’s look. Here’s why you should use the option to show a ruler in PowerPoint every time you design slides:
- Accurate Alignment: Easily align text, shapes, and images for clean, professional slides.
- Consistent Layouts: Keep your spacing and positions uniform across multiple slides.
- Time Efficiency: Quickly measure and adjust objects, no more guesswork.
- Improved Readability: Properly aligned content enhances comprehension and audience focus.
- Professional Appeal: Balanced, neat slides make your presentation look expert and trustworthy.
Tip: Combine the ruler with guides and gridlines for even more precise control when designing complex layouts.
Skip manual alignment and create perfectly structured PowerPoint presentations in minutes with SlidesAI.
Create Presentations Easily in Google Slides and PowerPoint
- No design skills required
- 3 presentations/month free
- Don't need to learn a new software

Conclusion
Mastering PowerPoint’s ruler feature is one of the simplest ways to make your slides look sharp and structured. With the ability to measure, align, and adjust objects easily, you can create presentations that look effortlessly professional.
Ready to streamline your slide creation even more?
Try SlidesAI, the fastest way to design stunning, well-aligned presentations automatically.
Frequently Asked Questions Around Showing & Using Ruler in PowerPoint
1. Where is the ruler in PowerPoint?
You can find it in the “View” tab. Once enabled, rulers appear along the top and left edges of your slide to guide alignment.
2. How do I rotate the on-slide ruler in PowerPoint?
Hover your mouse over the ruler and scroll up or down. The angle indicator in the center changes to show the rotation degree.
3. Can I display the ruler on all slides at once?
Yes. Once you enable the ruler in the “View” tab, it stays visible across your entire presentation.
4. Why should I use rulers in PowerPoint?
They help ensure your design is balanced and visually consistent by aligning text, shapes, and images with precision.
5. Can I use rulers with other tools?
Absolutely. Combine rulers with gridlines and guides to fine-tune layout accuracy and achieve a flawless design.
Key Takeaways
- PowerPoint’s ruler helps align slide elements accurately for a cleaner layout.
- You can activate it easily from the “View” or “Draw” tab.
- The on-slide ruler allows precise rotation and positioning of shapes
- Using rulers improves slide readability and visual balance.
- Combine rulers with guides or gridlines for even better control.
Ever tried to align text boxes or images in PowerPoint and found them just slightly off? It’s frustrating, especially when you are preparing a client pitch or class presentation. Imagine spending hours on slides, only to have uneven margins or misaligned graphics. That’s where PowerPoint’s ruler feature comes in.
By showing the ruler, you can align text, shapes, and images with precision. It saves you from endless trial and error. For example, if you want to align multiple charts in a quarterly report slide, rulers help you keep everything evenly placed.
This guide walks you through how to show the ruler in PowerPoint and why it’s such a valuable design tool.
How to Show the Ruler in PowerPoint
If you want to keep your layout clean and evenly spaced, the built-in ruler is your best friend. Here’s how to display it:
- Open Your PowerPoint Presentation
Launch PowerPoint and open the file where you want to adjust alignment. You can also start from a blank slide to apply design consistency from the beginning.
- Go to the View Tab in the Ribbon
At the top of your screen, find the “View” tab. This is where most layout tools like “Gridlines”, “Guides”, and “Rulers” live.
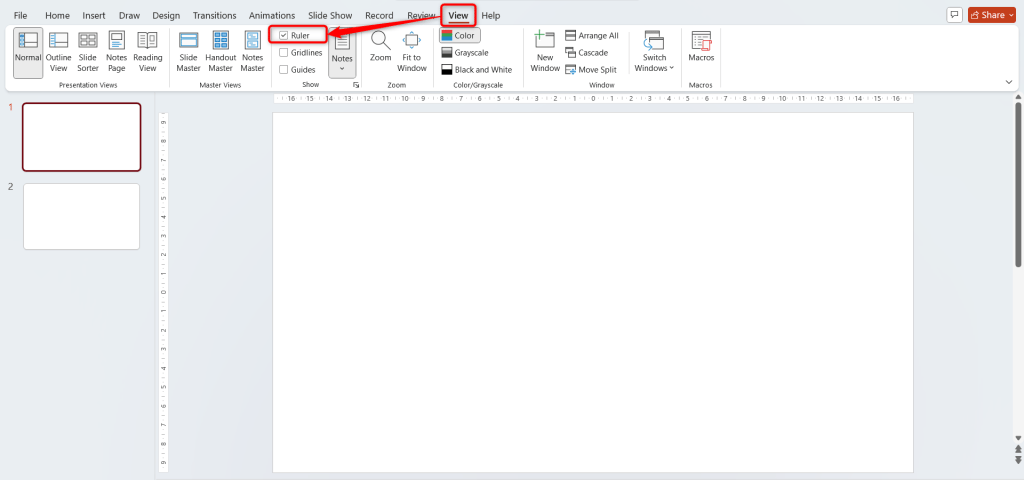
- In the Show Group, Check the Box Next to Ruler
Under the Show section, simply tick the box beside “Ruler”. This instantly displays horizontal and vertical rulers on your slide canvas.
- Start Aligning Your Objects Precisely.
Now, use these rulers to position shapes, text boxes, or images evenly. The rulers display measurements that help you maintain consistent spacing.
You can also explore how to align text boxes in PowerPoint for even cleaner layouts.
How to Show and Use the On-Slide Ruler in PowerPoint
The on-slide ruler is a powerful drawing tool that lets you measure and align objects right on the slide surface. Here’s how to use it effectively:
- Open Your PowerPoint Presentation
Open your existing presentation or start a new one where you want to draw or adjust objects with accuracy.
- Go to the Draw Tab in the Ribbon
Select the “Draw” tab. This is where creative tools like pens, shapes, and the ruler live.
- In the Stencils Group, “Click” on “Ruler” to Activate it
Once you click “Ruler”, a digital measuring line appears over your slide.
- Move the Ruler Across Your Slide
Click and drag it anywhere you want. It can be used horizontally, vertically, or diagonally. Perfect for the precise placement of arrows or shapes.
- Rotate the Ruler as Needed
Hover over it and scroll your mouse wheel up or down. You may notice a rotation angle number in the center. This makes it easy to measure or draw at specific angles.
- Align Your Elements Accurately
Use the ruler’s edge as a guide to position objects, ensuring they are perfectly aligned with other elements on the slide.
Check this guide on how to rotate the ruler in PowerPoint for more advanced control.
Why You Should Use the Ruler in PowerPoint
Even small alignment details can make or break your presentation’s look. Here’s why you should use the option to show a ruler in PowerPoint every time you design slides:
- Accurate Alignment: Easily align text, shapes, and images for clean, professional slides.
- Consistent Layouts: Keep your spacing and positions uniform across multiple slides.
- Time Efficiency: Quickly measure and adjust objects, no more guesswork.
- Improved Readability: Properly aligned content enhances comprehension and audience focus.
- Professional Appeal: Balanced, neat slides make your presentation look expert and trustworthy.
Tip: Combine the ruler with guides and gridlines for even more precise control when designing complex layouts.
Skip manual alignment and create perfectly structured PowerPoint presentations in minutes with SlidesAI.
Create Presentations Easily in Google Slides and PowerPoint
- No design skills required
- 3 presentations/month free
- Don't need to learn a new software
Conclusion
Mastering PowerPoint’s ruler feature is one of the simplest ways to make your slides look sharp and structured. With the ability to measure, align, and adjust objects easily, you can create presentations that look effortlessly professional.
Ready to streamline your slide creation even more?
Try SlidesAI, the fastest way to design stunning, well-aligned presentations automatically.
Frequently Asked Questions Around Showing & Using Ruler in PowerPoint
1. Where is the ruler in PowerPoint?
You can find it in the “View” tab. Once enabled, rulers appear along the top and left edges of your slide to guide alignment.
2. How do I rotate the on-slide ruler in PowerPoint?
Hover your mouse over the ruler and scroll up or down. The angle indicator in the center changes to show the rotation degree.
3. Can I display the ruler on all slides at once?
Yes. Once you enable the ruler in the “View” tab, it stays visible across your entire presentation.
4. Why should I use rulers in PowerPoint?
They help ensure your design is balanced and visually consistent by aligning text, shapes, and images with precision.
5. Can I use rulers with other tools?
Absolutely. Combine rulers with gridlines and guides to fine-tune layout accuracy and achieve a flawless design.