

To merge shapes in PowerPoint, select two or more overlapping shapes, go to the Shape Format tab, click on Merge Shapes in the “Insert Shapes” group, and choose your desired option. You can use Union to combine all shapes, Combine to remove overlapping areas, Fragment to split shapes into parts, Intersect to keep only the overlapping section, or Subtract to remove one shape from another.
Steps to Merge Shapes in PowerPoint
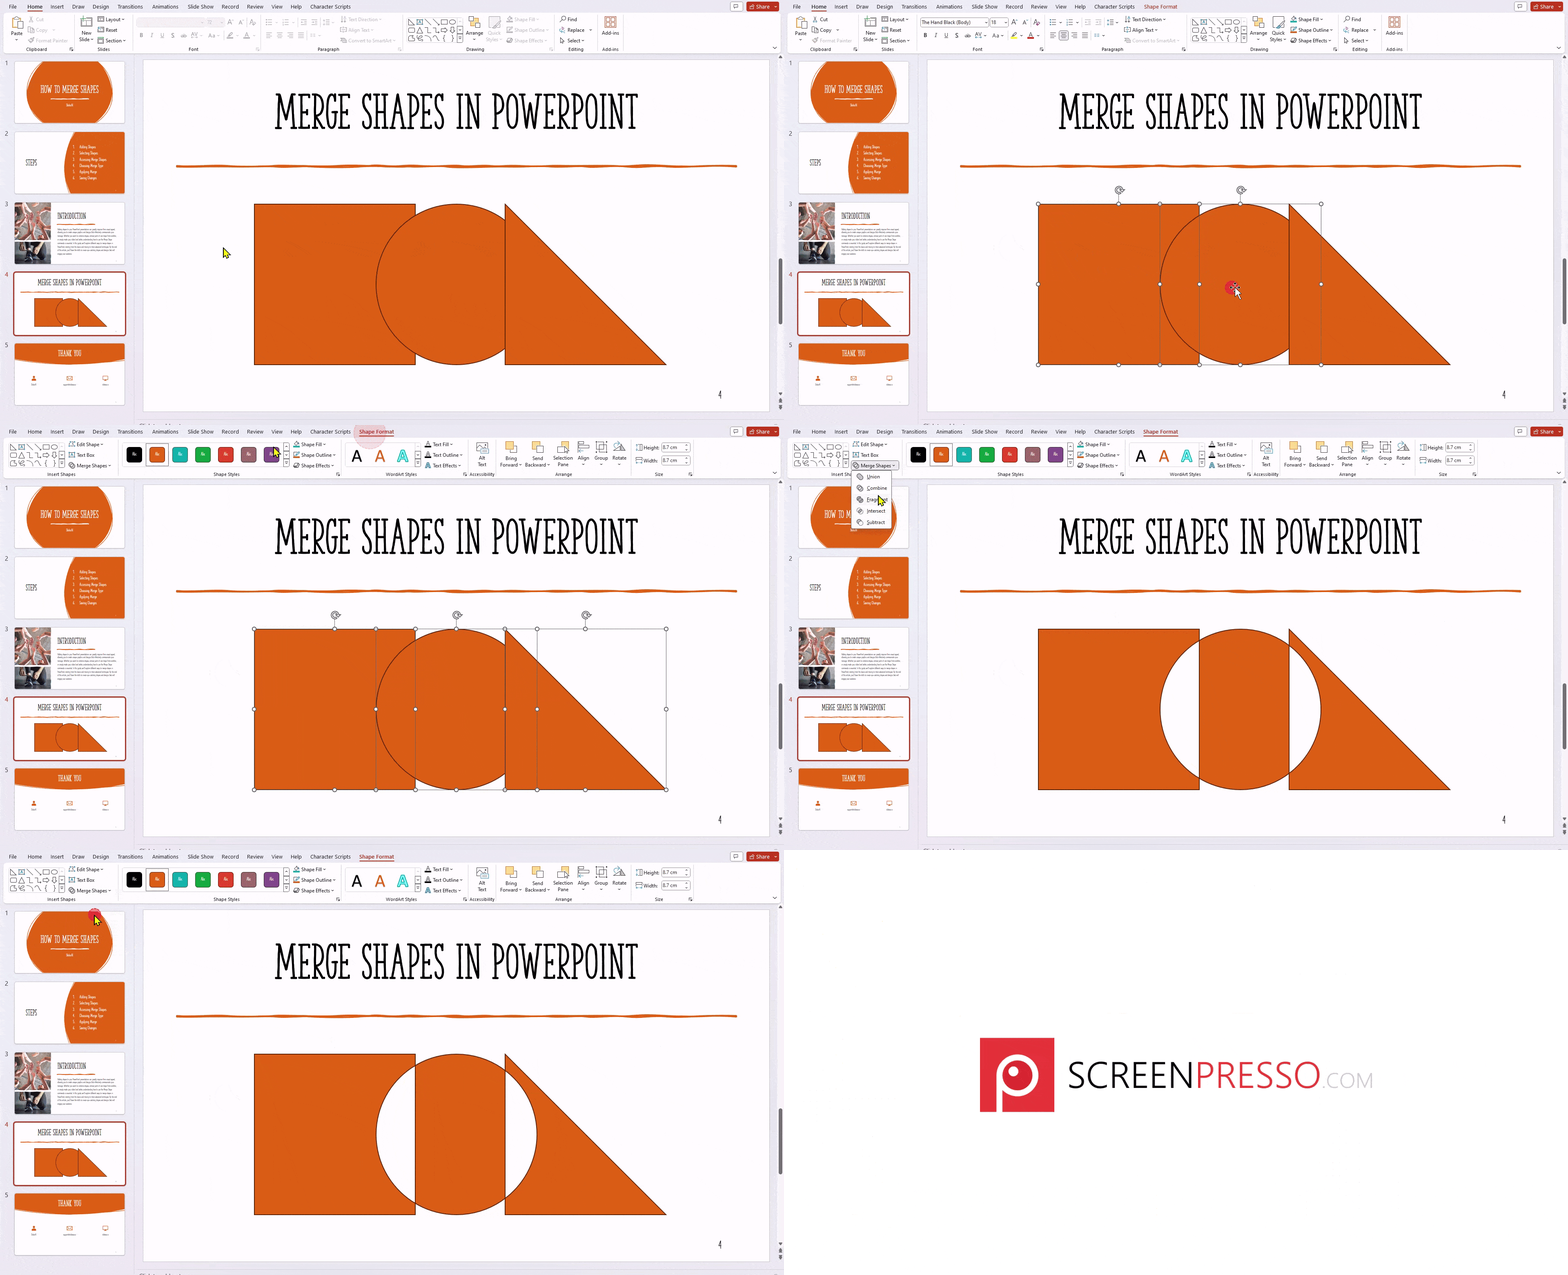
Step 1: Insert the Shapes
Start by opening the PowerPoint presentation where you want to merge shapes. Go to the Insert tab on the PowerPoint Ribbon and click Shapes in the Illustrations group. Choose the shapes you want to use and click and drag on the slide to draw them.
Repeat the process to add all the shapes you want to merge. For the Merge Shapes options to produce the desired result, position the shapes so that they overlap where necessary.
Step 2: Select the Shapes You Want to Merge
Once you have added and positioned your shapes, select all the shapes you want to merge. Hold down the Shift key and click each shape one by one.
Make sure all the required shapes are selected before moving to the next step. You can also drag your cursor around multiple shapes to select them at once.
Step 3: Open the Merge Shapes Menu
With the shapes selected, go to the Shape Format tab that appears on the PowerPoint Ribbon.
In the Insert Shapes group, click Merge Shapes. A drop-down menu will appear with five options:
- Union
- Combine
- Fragment
- Intersect
- Subtract
Each option creates a different result based on how the selected shapes overlap.
Step 4: Choose a Merge Shapes Option
Select the option that matches the result you want to create. PowerPoint will immediately modify the selected shapes based on the option you choose.
For example, select Union if you want to turn multiple shapes into one larger shape, or choose Intersect if you only want to keep the area where the shapes overlap.
Step 5: Adjust the Merged Shape
After applying the selected Merge Shapes option, PowerPoint creates the resulting shape on your slide. You can now resize, move, rotate, or format it like other PowerPoint shapes.
If the result isn’t what you expected, press Ctrl + Z to undo the action and try a different Merge Shapes option or adjust the position of the original shapes.
Step 6: Save Your Presentation
Once you’re satisfied with the merged shape, save your PowerPoint presentation. You can continue editing and formatting the resulting shape just like other elements on your slide.
What Does Each Merge Shapes Option Do?
PowerPoint provides five Merge Shapes options, and each one produces a different result. Understanding how they work makes it easier to choose the right option for your design.
Union
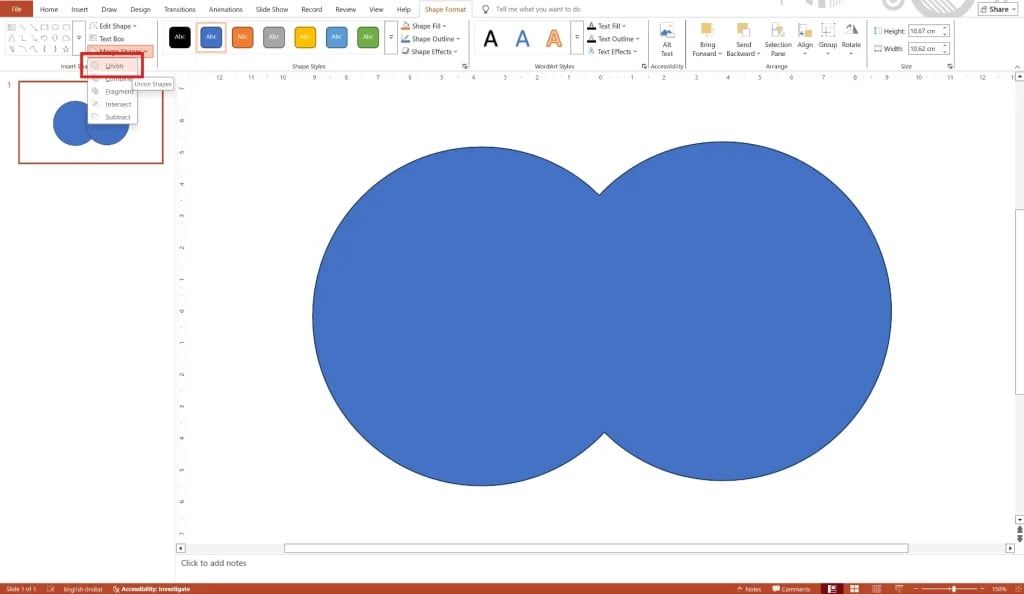
Union combines two or more selected shapes into a single shape. It removes the boundaries between the shapes and creates one continuous shape from the selected objects.
Unlike grouping, the resulting object behaves as a single shape that you can resize, move, and format. The resulting shape uses the formatting of the first shape selected, so pay attention to the selection order when using Union.
Combine
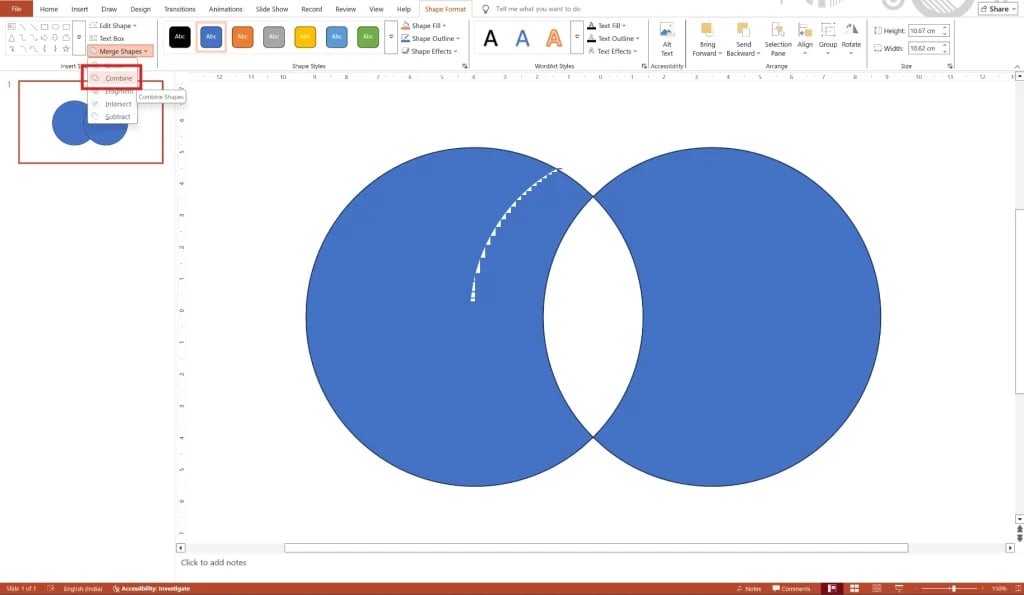
Combine removes the areas where the selected shapes overlap while keeping the remaining areas as one combined result. It is useful when you want to create a shape with cut-out sections or transparent-looking gaps.
For example, if two circles overlap, Combine removes their shared area and leaves the non-overlapping portions of the shapes.
Fragment
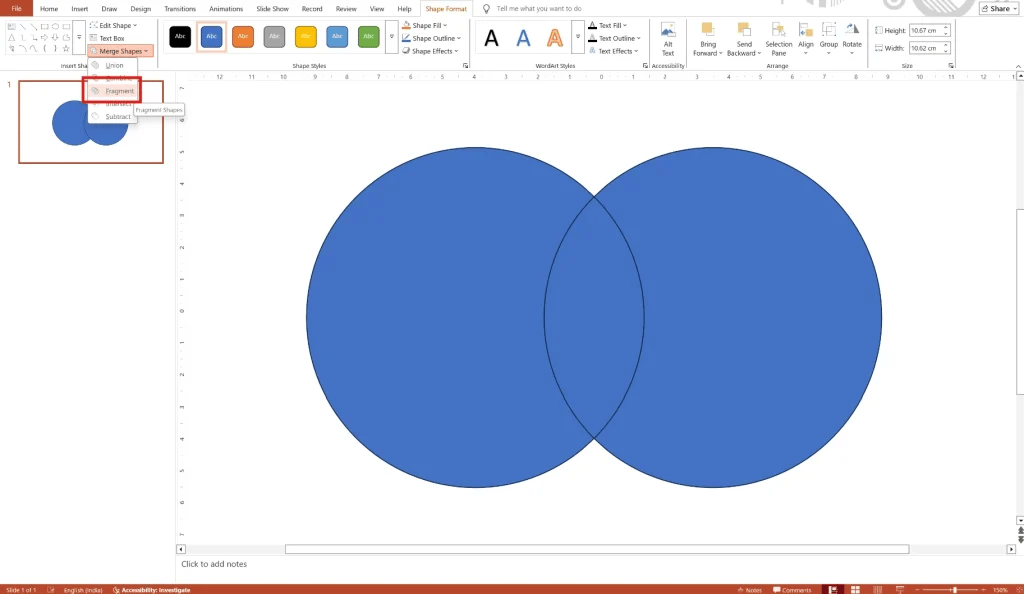
Fragment divides the selected shapes into separate pieces wherever they overlap or intersect. Instead of creating one final shape, it breaks the original shapes into multiple smaller shapes.
This option is useful when you want to work with individual sections of overlapping shapes separately. You can then move, recolor, resize, or delete each resulting piece independently.
Intersect
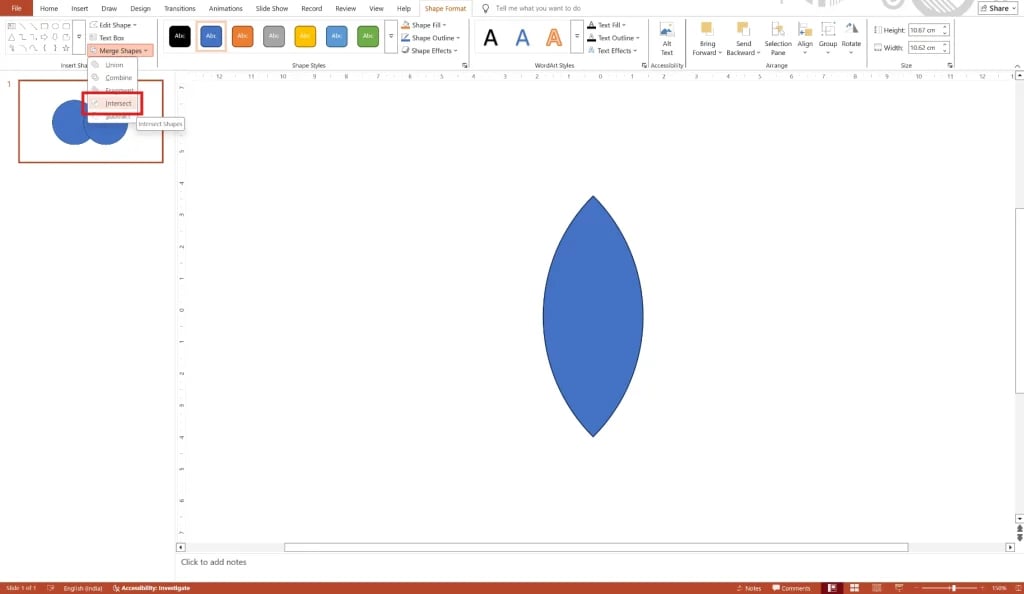
Intersect keeps only the area where the selected shapes overlap. Everything outside the shared area is removed, leaving a single shape based on the intersection of the selected objects.
For example, if you overlap a circle and a rectangle, Intersect keeps only the portion where the circle and rectangle meet.
Subtract
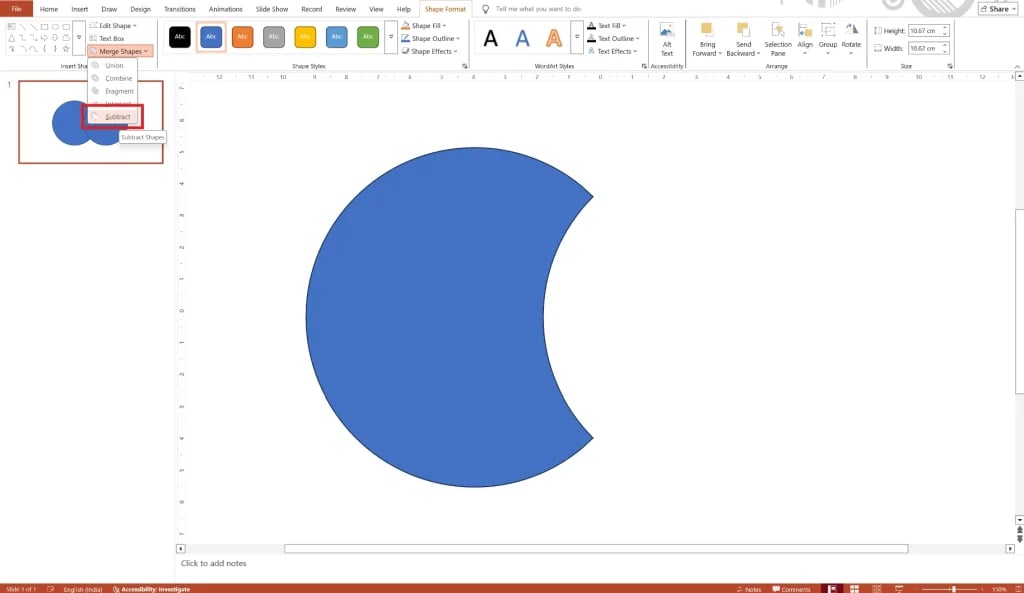
Subtract removes the overlapping area of one shape from another. The first shape selected remains as the base shape, while the shape selected afterward is used to cut away the overlapping portion.
For example, if you place a small circle over a large rectangle and use Subtract, the overlapping part of the rectangle is removed, creating a circular cutout.
Note: With Subtract, the first shape you select becomes the resulting shape, while the subsequently selected shape or shapes are removed from it. Pay close attention to the selection order to get the desired result.
Common Mistakes to Avoid When Merging Shapes in PowerPoint
1. Shape Selection
Make sure to select all the shapes you want to merge before using the “Merge Shapes” or “Combine Shapes” feature.
2. Compatibility Check
Check that the shapes you’re trying to merge can actually be merged using the “Merge Shapes” feature. Some shapes might not work together.
3. Stacking Order Adjustment
Remember that the order you select shapes in can change how they merge. If the result isn’t what you expected, try rearranging the order of the shapes.
4. Overlapping Areas
Be aware that merging shapes can create areas where they overlap. Adjust the shapes or use options like “Fragment” or “Intersect” to fix any overlap issues.
5. Grouping Merged Shapes
After merging shapes, it’s a good idea to group them together to avoid accidentally changing the merged shape.
6. Selecting the Correct Merge Option
Choose the right merge option (Union, Combine, Fragment, Intersect, or Subtract) based on what you want the final shape to look like.
7. Alignment and Distribution
Once you’ve merged shapes, make sure they’re aligned properly and evenly distributed for a neat and professional finish in your presentation.
“Skip the design work and generate polished PowerPoint slides in minutes with SlidesAI”
Closing Thoughts
With a little practice and these helpful tips, you’ll be merging shapes in PowerPoint like a pro in no time. This powerful feature unlocks a world of creative possibilities, allowing you to design unique and impactful visuals that will leave a lasting impression on your audience. So, go forth and unleash your inner design guru!
With SlidesAI, you can generate your presentation in minutes using AI and choose from a library of customizable templates, leaving you more time to refine your visuals with advanced PowerPoint features like Merge Shapes for a unique, professional finish.
Create Presentations Easily in Google Slides and PowerPoint
14M+Installs
 Install add-in
Frequently Asked Questions Related to Merging Shapes In PowerPoint
How can Merge Shapes be used in presentations?
Merge Shapes can be used in presentations to add depth and dimension, highlight specific areas, create diagrams and flowcharts, enhance slide backgrounds, and design custom graphics and icons.
How do I merge shapes in PowerPoint?
To merge shapes in PowerPoint, select the shapes you want to merge, navigate to the “Format” tab, click on “Merge Shapes,” and choose one of the available merge options (Union, Combine, Fragment, Intersect, or Subtract) based on your desired outcome.
Can I undo a merge operation in PowerPoint?
Yes, you can undo a merge operation in PowerPoint by pressing Ctrl + Z or selecting “Undo” from the Edit menu.
Are there any limitations to merging shapes in PowerPoint?
While Merge Shapes offers a range of options for combining shapes, some complex shapes may not merge as expected. It’s recommended to experiment with different shapes and merge options to achieve the desired result.
Why is “Merge Shapes” not available in PowerPoint?
There might not be any shapes selected on your slide. The “Merge Shapes” option appears only when you have at least two shapes chosen. Try inserting some shapes and then try merging them!
How do I merge shapes in PowerPoint using Union?
To merge shapes with Union in PowerPoint, select the shapes and choose “Merge Shapes” > “Union” under the Drawing Tools Format tab (appears when shapes are selected).
How to merge two shapes using the subtract option in PowerPoint?
- Select two shapes (hold Shift to pick both).
- Go to the Shape Format tab (appears when shapes are selected).
- Click Merge Shapes > Subtract. (Subtracts second shape from first).
Can you merge 2 shapes in powerpoint?
Yes, You can merge 2 shapes in PowerPoint! Select the 2 shapes (hold Shift to pick both) and then under the “Shape Format” tab (appears when selected), choose “Merge Shapes” for a combined shape.