
Timelines are one of the simplest ways to explain progress, history, or plans without overwhelming your audience. Whether you are presenting a project roadmap, company milestones, or a step-by-step process, Google Slides makes it easy to build clean, visual timelines without needing design experience.
This guide explains multiple ways to create a timeline on Google Slides, from using built-in tools to designing one manually.
How to Make a Timeline on Google Slides?
Method 1: Using a SlidesAI Timeline Template
If you want to create a timeline quickly without worrying about design from scratch, SlidesAI’s ready-made templates are a great place to start. They’re easy to use, visually balanced, and work seamlessly with Google Slides.
Step 1: Open SlidesAI and go to the Free Templates section. Click on All Templates to view the full library.
Step 2: In the search bar, type Timeline Presentation Template and select the template you like.
Step 3: On the right-hand side, click the Download dropdown and choose Google Slides as your format.
Step 4: A template preview will appear. Click Use this template in the top-right corner.
Step 5: The timeline template will open directly in Google Slides. Customize the content and design to match your requirements.
Method 2: Using a Google Slides Timeline Template
Want a running start on timeline creation? Google Slides offers various pre-made timeline templates that provide an easy foundation to build upon. Here’s how to use them:
Step 1: Open your presentation and select the slide to which you want to add a timeline. Click on the “Insert” menu and choose “Diagram”. Click on the “timeline” option and a template sidebar appears on the right.
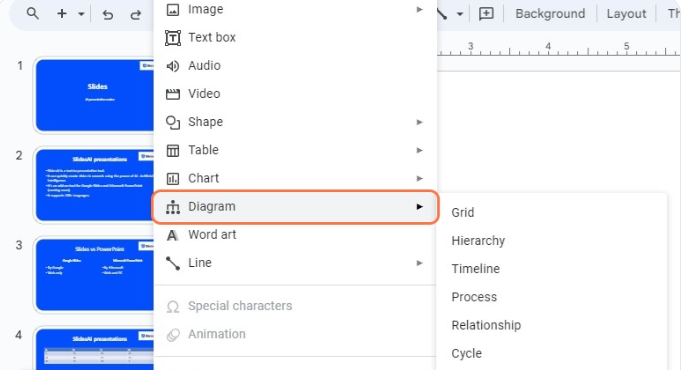
Step 2: You will find different timeline designs on the sidebar. Browse through the gallery to select the one that best fits your presentation’s style, brand, and topic.
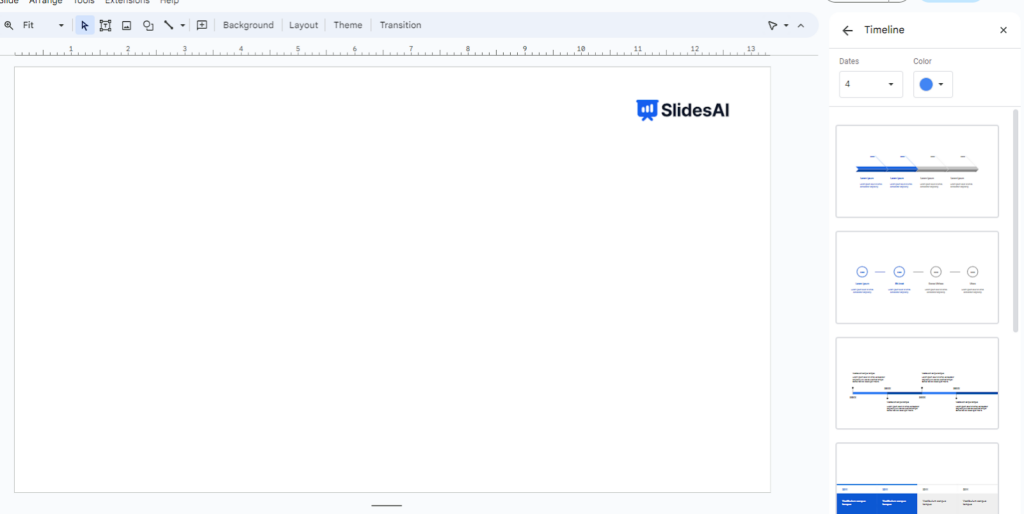
Step 3: Use the Dates and Colours dropdown menus to set up the timeline. The timeline designs will update accordingly.
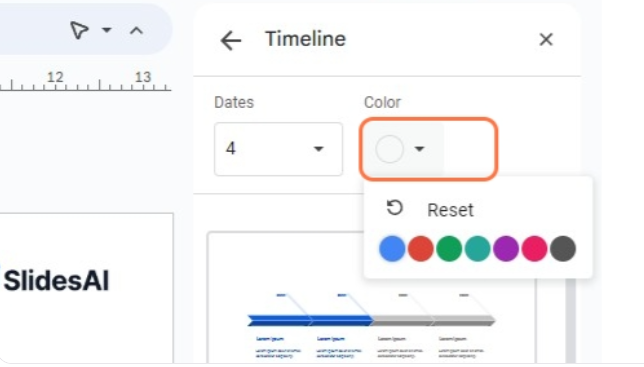
Step 4: Once selected, the timeline template will automatically populate the slide with visuals and text where you can add your details. Edit the template colors, fonts, and sizing to match your brand aesthetic.
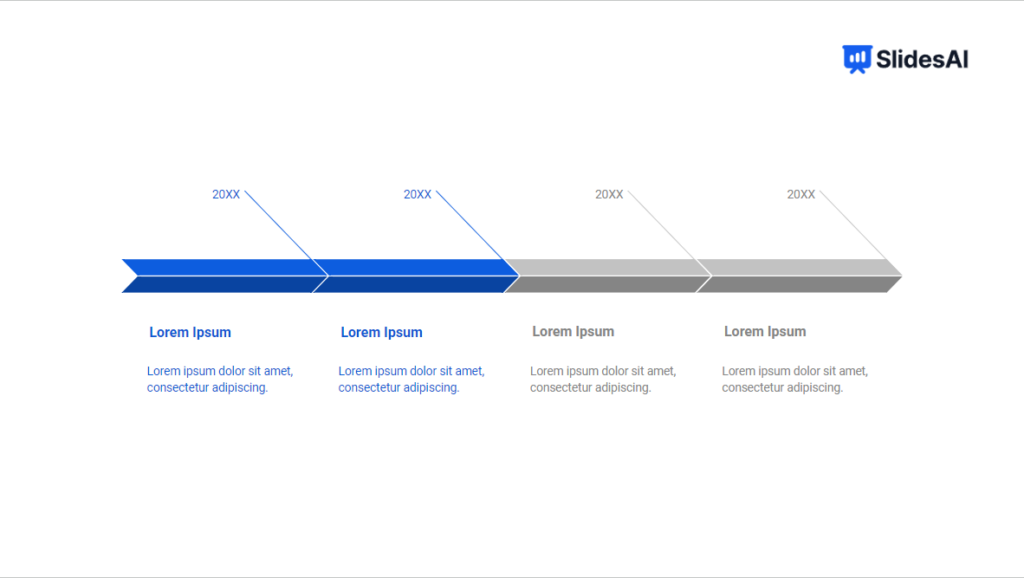
In just a few clicks, Google Slides’ timeline templates enable inserting timelines into your presentation quickly.
What if you didn’t like any of the timeline templates? Can you create fully customized timelines from scratch? Yes.
You can also download our Timeline templates for your presentation.
Method 3: Creating a Timeline in Google Slides from Scratch
There are 3 parts to making a timeline, which are creating an outline, creating callouts for your text, and creating textboxes for your timeline. The steps for the following are listed below:
Create an Outline for Your Timeline
Step 1 – Open Google Slides: Start by opening your Google Slides presentation.
Step 2 – Choose Your Slide: Pick the slide where you want to add your timeline.
Step 3 – Draw a Line: Click on “Select Line” in the toolbar, then draw a horizontal line across the slide.
Step 4 – Customize Line: Change the color and thickness of the line to match your presentation’s style.
Step 5 – Add Milestones: Click on “Shape” in the toolbar, then select an oval shape to make circles for milestones. You can use different shapes like circles, rectangles, or hexagons. We’ll use five circles for this timeline.
Step 6 – Style Milestones: Change the color and border of the circles to match your presentation’s design. Make sure they fit with the other slides.
Step 7 – Color Matching: To make it look cohesive, use the same color palette for the circles as you did for the line. You can also make the circle borders invisible by selecting the “Transparent” option.
Step 8 – Duplicate Circles: Make four more copies of the circle for a total of five milestones. You can do this by selecting the circle and pressing Ctrl+C and Ctrl+V (Windows) or Cmd+C and Cmd+V (Mac) to copy and paste.
Step 9 – Arrange Milestones: Place all the circles evenly along the line to represent your timeline’s milestones. Make sure they’re spaced out equally.
Create Callouts for Your Text
Step 1 – Select Callout Shape: Click on “Shape” in the toolbar, then choose “Callouts” from the options. Place it on top of the first circle to outline your timeline.
Step 2 – Choose Style: You can use ready-made callouts from Google Slides or create a custom box using square or rectangular shapes. Make sure to match the border style and color for a consistent look.
Step 3 – Group Elements: If you customize your callout shape, select the whole area and group the elements together for easier handling.
Step 4 – Duplicate Callouts: Make copies of the callout shapes by pressing Ctrl+C and Ctrl+V (Windows) or Cmd+C and Cmd+V (Mac).
Step 5 – Position Callouts: Place each callout box above its respective circle, maintaining consistent design and size with your template.
Step 6 – Create Space: To add visual interest, position one callout box above the circle and another below it.
Step 7 – Flip Callouts: Select the callout shape and use “Arrange” > “Rotate” > “Flip Vertically” to point the callout towards the circle. Alternatively, use the shortcut by selecting the callout, then dragging the farthest dot while holding ‘Shift’ to rotate in increments.
Step 8 – Align Callouts: Ensure all callouts are properly aligned and evenly spaced from their respective circles.
Create Text Boxes for Your Timeline
Step 1 – Select Text Boxes: Start by clicking on the “Text Boxes” option in the toolbar.
Step 2 – Insert Text: Click and drag the text box into the callout box, then type in your text. Keep it concise for easy reading and understanding by your audience.
Step 3 – Style Text: Use the formatting options in the toolbar to style your text according to the design of your master slides.
Step 4 – Copy and Paste: Once you’ve formatted the text to your liking, copy and paste the text boxes into all the callouts. Adjust the text as needed for each milestone.
Step 5 – Insert Content: Click on each text box to insert the relevant text for each milestone.
Step 6 – Provide Overview: Write a brief overview of each milestone to give context to your timeline.
Step 7 – Maintain Uniformity: Ensure that the font type and size of the text match the rest of your slides for a consistent look and feel.
How Do You Make a Cool Timeline on Google Slides?
A well-designed timeline should be easy to scan and instantly understandable. Small design choices can make a big difference in how professional and clear your slide looks.
- Keep the text minimal – Use short titles or keywords instead of full sentences. Your timeline should highlight key moments, not explain everything in detail. If more context is needed, add it in your verbal explanation or speaker notes.
- Maintain consistent spacing – Make sure each milestone is evenly spaced. Uneven gaps can make the timeline feel messy and distract the audience. Use alignment tools in Google Slides to keep everything balanced.
- Stick to a simple color palette – Limit your design to one main color and one accent color. Too many colors can overwhelm the slide and reduce readability. Use bold colors only to highlight important milestones.
- Use icons or shapes for clarity – Icons, dots, or simple shapes help guide the viewer’s eye and make each step easier to follow. They also reduce the need for extra text.
- Choose readable fonts – Avoid decorative fonts. Use clean, simple fonts and keep font sizes consistent across all timeline points so the information is easy to read from a distance.
- Avoid overcrowding a single slide – If your timeline has many steps, split it across multiple slides. A clean, focused timeline is more effective than squeezing everything into one slide.
- Highlight progression clearly – Use arrows, numbers, or subtle animations to show the flow from one step to the next. This helps the audience understand the sequence at a glance.
- Follow your brand identity – Make sure your timeline aligns with your brand guidelines. Use your brand’s colors, fonts, and visual style consistently so the slide feels cohesive and professional, especially in business or client-facing presentations.
These small improvements can turn a basic timeline into a polished, professional slide that communicates your message clearly and confidently.
Conclusion
And there you have it – everything you need to know to create sleek timelines in Google Slides! From leveraging templates to building custom timelines, you now have the skills to visualize chronology and sequencing for smooth presentations.
But, creating an entire slide deck can still be time-consuming and tedious. Instead of manual work, explore tools that automate presentation creation – like SlidesAI.
SlidesAI is a revolutionary text-to-presentation tool that integrates with Google Slides as an add-on. Just type your content, (or copy-paste it, we won’t judge) and SlidesAI will generate professional, visually stunning slides tailored to your brand in seconds.
Cut presentation workload without compromising quality. Take your next talk to the next level. Give SlidesAI a try today!
Build Stunning Slides in Seconds with AI
- No design skills required
- 3 presentations/month free
- Don't need to learn a new software

Explore More:
- How to Make a Table on Google Slides
- How to Make a Pie Chart in Google Slides
- How to Make a Calendar in Google Slides
- Create an Org Chart in Google Slides
Frequently Asked Questions
1. What is a timeline presentation or timeline slides?
A timeline presentation uses a series of slides to visually map out a chronological sequence of events or historic progression. Each slide features part of the overall timeline, allowing presenters to explain the timeline narrative in detail.
2. How do you open a PowerPoint Timeline Template in Google Slides?
To open a PowerPoint Timeline template in Google Slides:
- Save it as a .pptx file.
- Upload to Google Drive by dragging and dropping or using “New” > “File Upload”.
- Open it in Google Slides by double-clicking the file in your Drive.
3. How do you make a vertical timeline on Google Slides?
Create a horizontal template, select all elements, rotate them 90 degrees clockwise/counterclockwise, and resize the slide if needed.
4. How do I customize a timeline template in Google Slides?
Customize colors and fonts by selecting shapes or text boxes, then use the toolbar to adjust fill color, line color, font style, size, and color. Rearrange elements by clicking and dragging them along the timeline, and resize shapes as required. Add more shapes or text boxes using “Insert > Shape” or “Insert > Text box,” and remove unnecessary elements. Double-click text placeholders to easily edit dates, events, or descriptions.
5. Can I add images and videos to my Google Slides Timeline?
For Images: Insert images via Insert > Image, then adjust size and position. For Videos: Insert videos using Insert > Video, then position and resize them.
6. How do I change the colors and fonts on my timeline?
Use toolbar options like Fill Color for the inner color, Line Color for the outline, and Font Formatting for style, size, and color adjustments.