To add a background image in PowerPoint, right-click on a blank area of a slide, select Format Background, choose Picture or Texture Fill, and click Insert to select your image. You can adjust the transparency for better readability, and click Apply to All if you want the same background across your entire presentation.
In this guide, you’ll learn how to insert a picture as a background in PowerPoint step by step, along with tips to customize it and make your presentation stand out.
How to Insert a Picture as a Background in PowerPoint (Step-by-Step Guide)
Want to add an image as a background in PowerPoint? You can do it easily using the “Format Background” option. Just follow these steps, and you’ll have a customized slide in no time.
1. Open Your PowerPoint Presentation
First, launch Microsoft PowerPoint and open the presentation where you want to set an image as the background. Click on the slide that needs the background change.
2. Access the Design Tab
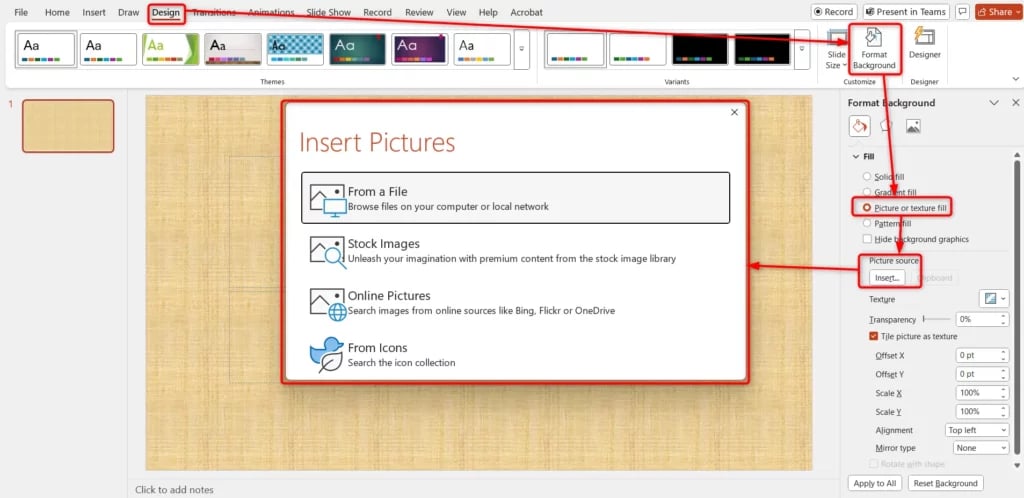
Look at the top menu and click on the “Design” tab. This section contains all the options for changing your slide’s appearance.
3. Open the Format Background Panel
- On the right side of the “Design” tab, click “Format Background“.
- Alternatively, right-click anywhere on the slide and select “Format Background” from the menu.
- A panel will appear on the right side of your screen. This is where you’ll make all the background changes.
4. Choose Picture or Texture Fill
In the “Format Background” panel, you’ll see different fill options. Select “Picture or Texture Fill” to insert an image as your background.
5. Select an Image Source
Now, you need to pick the image you want to use. Click on “Insert” under the “Picture Source” section, and you’ll get different options:
- From a File: Upload an image from your computer.
- Stock Images: Choose from Microsoft’s premium stock image collection.
- Online Pictures: Search for images using Bing, Flickr, or OneDrive.
- Icons: Pick an icon from PowerPoint’s built-in icon library.
- Clipboard: If you recently copied an image, select Clipboard to paste it directly.
Choose the image that best fits your slide’s design.
6. Adjust the Background
Once your image is inserted, you can tweak it for the best look. PowerPoint allows you to:
- Change Transparency: Use the slider to make the background more or less visible.
- Reposition the Image: Adjust the placement to ensure important elements aren’t cut off.
- Tile the Image: If the image is small, you can repeat it across the slide.
Play around with these settings until you’re happy with the result.
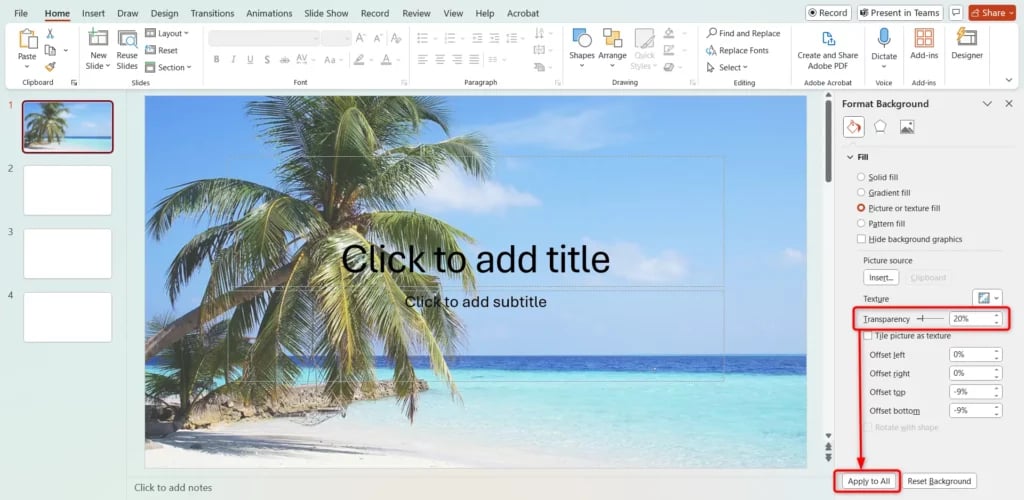
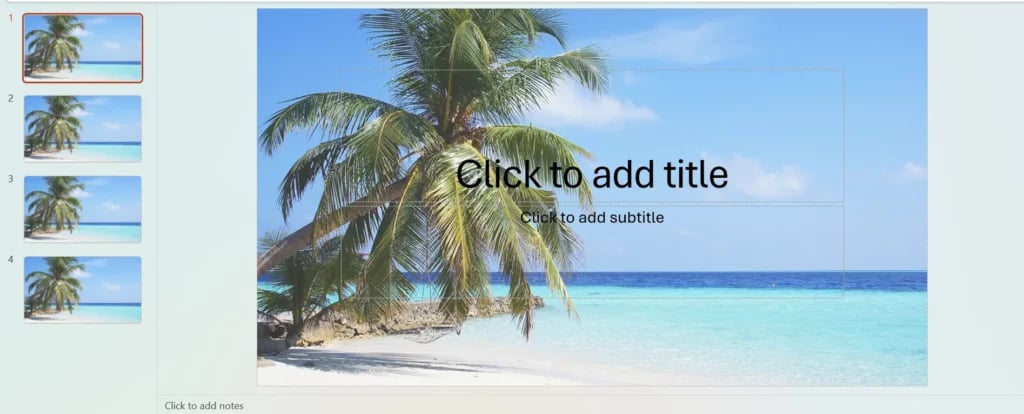
7. Apply to All Slides (Optional)
If you want every slide in your presentation to have the same background, click “Apply to All” at the bottom of the “Format Background” panel. If not, leave it as it is, and only the selected slide will change.
8. Close the Format Background Panel
Once everything looks good, simply close the “Format Background” panel. Your image background is now set!
Build Stunning Slides in Seconds with AI
- No design skills required
- 3 presentations/month free
- Don't need to learn a new software

Read Related – How to Make a Picture Transparent in PowerPoint
Best Practices for Choosing the Right Background Image
Not every image works well as a slide background. Choosing the right one is just as important as inserting it correctly. Here are some tips to help you select the perfect background:
1. Keep It Simple
Avoid busy or overly detailed images. A clean, minimal background ensures your text stays readable.
2. Use High-Resolution Images
Blurry or pixelated backgrounds downgrade the overall quality of your presentation. Aim for images that are at least 1920×1080 pixels.
3. Ensure Good Contrast
Light text on a dark background—or vice versa—improves readability. If the image is too bright or too dark, adjust the transparency until the content stands out.
4. Make It Relevant
Choose visuals that match your topic or brand identity. For example:
- A world map for global business topics
- Nature images for environmental content
- Branded elements (logos, patterns) for company presentations
5. Avoid Copyright Issues
Use royalty-free images, stock photos, or images you have permission to use. PowerPoint’s stock image library is a safe option.
When Should You Avoid Using a Full Image Background?
Using a picture background can be powerful, but it’s not always the best choice. Consider skipping it when:
- Your slide has a lot of text. A busy background will make it harder to read.
- The image distracts from your main points. If the audience focuses more on the background than the content, it’s not helping.
- You are preparing a formal or academic presentation. In professional settings, subtle colors or gradients are often more effective.
In situations like these, consider using a solid color, gradient, or subtle texture instead.
Closing Thoughts
A good background does more than just decorate a slide. It sets the tone and makes the content more engaging. The right image can turn a dull presentation into something that grabs attention. Play around with different visuals until your slides feel just right.
Frequently Asked Questions
Can I make a picture transparent in a PowerPoint background?
Yes, you can make a picture transparent in a PowerPoint background. Once you insert the background image, go to the Format Background panel and use the Transparency slider to adjust the opacity to your liking.
How do I apply a background image to all slides in PowerPoint?
After setting your picture as the background, simply click “Apply to All” in the Format Background panel. This will make the background consistent across all slides, saving you time when designing your presentation.
What is the best image format for a PowerPoint background?
JPEG and PNG are the most commonly used formats. However, PNG is generally the better choice. It supports transparent backgrounds, has lossless compression, and maintains high image quality.
Can I use PowerPoint stock images as a background?
Yes, PowerPoint provides a library of Stock Images that you can use as backgrounds. These images are high-quality and royalty-free, giving you a range of options to enhance your presentation without worrying about copyright issues.