
Creating an engaging presentation isn’t just about the content. It’s also about how it looks, and the background of your slide plays a crucial role in its appearance. If you wondered how to change the slide background in PowerPoint to make it more appealing, you are in the right place!
This quick guide walks you through every method step by step, whether you want a simple color, a custom image, or a brand-consistent background across all slides.
How to Change Background in PowerPoint
Changing the background in PowerPoint is easy once you know its simple process. Follow these steps to give your slides a fresh look.
Step 1: Open your PowerPoint presentation. You can start a new one or open an existing project.
Step 2: Select the slide you want to update from the left-hand panel. Remember, your changes apply only to the selected slide unless you decide otherwise later.
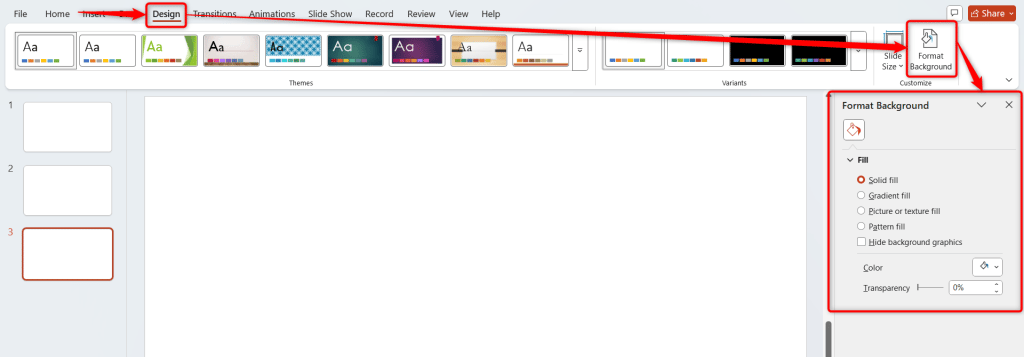
Step 3: Go to the “Design” tab on the top ribbon.
Step 4: Click “Format Background” under the “Customize” section. A panel appears on the right side of the screen.
Step 5: Choose a “Solid Fill” if you want a single-color background. Click the “Color” box to select from the palette or pick a custom shade.
Step 6: For a gradient effect, choose “Gradient Fill”. You can blend two or more colors for a smooth fade. Use the “Direction” and “Gradient Stops” options to adjust how the colors transition.
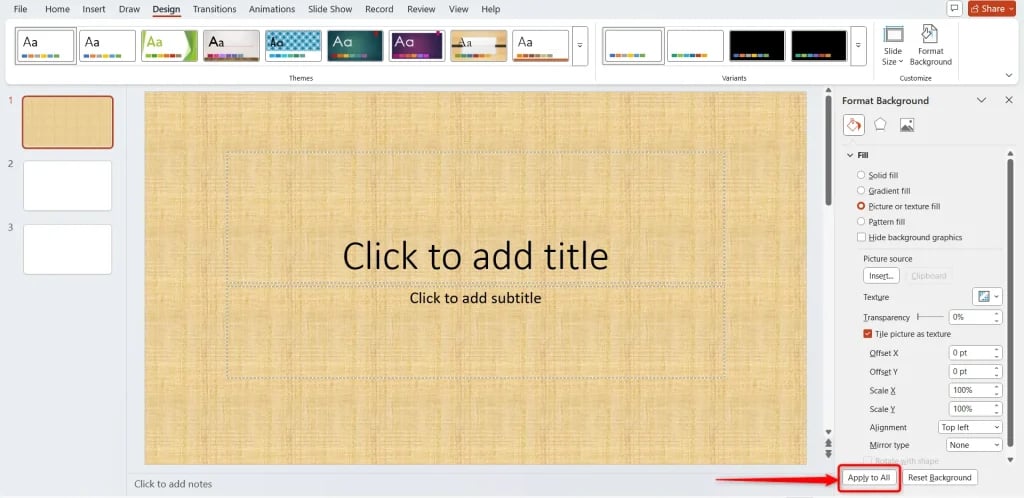
Step 7: Want to use an image or texture? Select “Picture or Texture Fill”. You can upload a photo from your computer or pick one of PowerPoint’s built-in textures. Adjust “Transparency” if the image feels too bold or distracts from your text.
Step 8: To use a preset design, choose “Pattern Fill”. Then select from different patterns and adjust their foreground and background colors.
Step 9: Once you are happy with the background, click “Apply to All” if you want it across every slide, or “Close” if it’s for one slide only.

Want professionally designed PowerPoint presentations without manually adjusting backgrounds and layouts? Create your slides with SlidesAI in minutes
How to Change the Background in PowerPoint Using the Slide Master
Now you know how to change the background of a slide in PowerPoint and apply it to the whole presentation, if required. But what if you want all your slides to share a consistent theme at once? It can be your company’s branding colors or a uniform image. The Slide Master is the best way to do it.
Here’s how you can change the background for every slide at once:
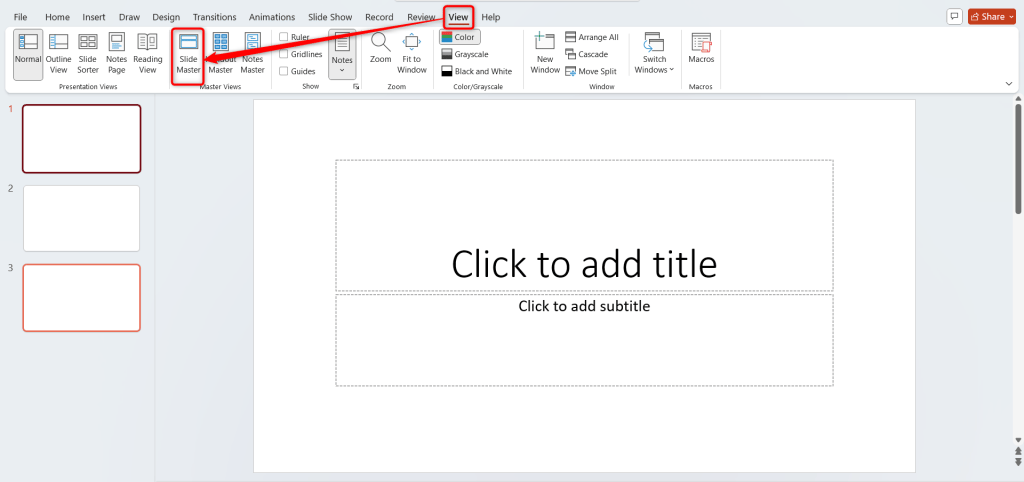
Step 1: Click on the “View” tab at the top of your screen.
Step 2: Select “Slide Master” from the options. This opens a view that controls the layout and style for all slides.
Step 3: Now, click “Background Styles” → choose “Format Background”. A new panel appears on the right side.
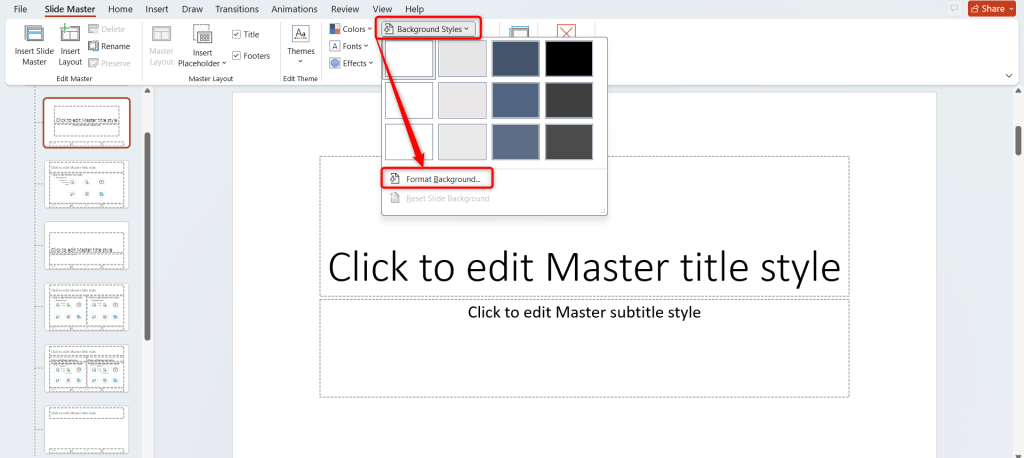
Step 5: Under “Fill Options”, choose one of the following:
- Solid Fill: Perfect for a clean, professional look.
- Gradient Fill: Adds color depth and movement.
- Picture or Texture Fill: Ideal for branded slides with company logos or imagery.
- Pattern Fill: Great for a creative or playful theme.

Step 6: If you select a “Picture Fill”, click “Insert Picture From” and choose an image from your files, stock photos, or online sources.
Step 7: Adjust the “transparency” to keep your text readable, especially if the image is detailed.
Step 8: Click “Apply to All” to make your chosen background appear on every slide in the presentation.
Step 9: Once done, select “Close Master View” to return to your regular editing screen.
Using the Slide Master saves time and ensures your slides look consistent throughout the presentation.
Tip: For More Design Control, Check Out How to Edit a Master Slide in PowerPoint.
Create Presentations Easily in Google Slides and PowerPoint
14M+Installs

Conclusion
Changing the background in PowerPoint is one of the easiest ways to enhance your presentation’s look and feel. Whether you add a solid color for simplicity, a gradient for style, or a company image for branding, PowerPoint gives you all the tools you need.
Master these steps and your slides are always going to look polished, cohesive, and presentation-ready in minutes!
Working With Google Slides Instead?
Here’s How to Change Background on Google Slides.
Frequently Asked Questions Around Changing Background in PowerPoint
1. How can I change the background color in PowerPoint?
To change background color in PowerPoint, open your slide, go to the “Design” tab → “Format Background” → select “Solid Fill” → pick a color → then click “Apply” for one slide or “Apply to All” for every slide.
2. How do I change the background for all slides at once?
Use the “Slide Master” feature. Go to “View” → “Slide Master” → select your master slide → click “Format Background” → make your changes → and choose “Apply to All”.
3. How do I reset the background to default?
If you want to remove your custom background, open “Format Background” again and click “Reset Background”. This way, you slide returns to PowerPoint’s default setting.