When you are creating presentations, there are times when you may want to add checkboxes. This could be for to-do lists, training slides, surveys, or interactive presentations where you want viewers to mark options. PowerPoint does not show a checkbox button by default, which is why many people get confused about how to insert one. The good part is that there are simple ways to add checkboxes depending on what you need. In this guide, you will learn exactly how to insert a checkbox in PowerPoint and use it properly in your slides. Let’s jump right into it.
How to Add Checkboxes in PowerPoint?
Adding checkboxes is simple once you enable the right tools inside PowerPoint. Follow these steps to add and use checkboxes easily:
Step 1: Enable Developer Tab
To insert interactive check boxes, you first need to turn on the Developer tab in PowerPoint.
- Go to File and click Options.
- Select Customize Ribbon from the left menu.
- In the right-hand list, find Developer and tick the checkbox next to it.
- Click OK to save the changes.
Once enabled, the Developer tab will appear at the top of your PowerPoint window.

Step 2: Insert Checkbox Control
Now that the Developer tab is visible, you can add the checkbox to your slide.
- Click on the Developer tab.
- In the Controls group, click the Checkbox icon. It looks like a small box with a check mark.
- Click anywhere on the slide and drag to place the checkbox where you want it.
You can resize or move the checkbox just like any other object on the slide.
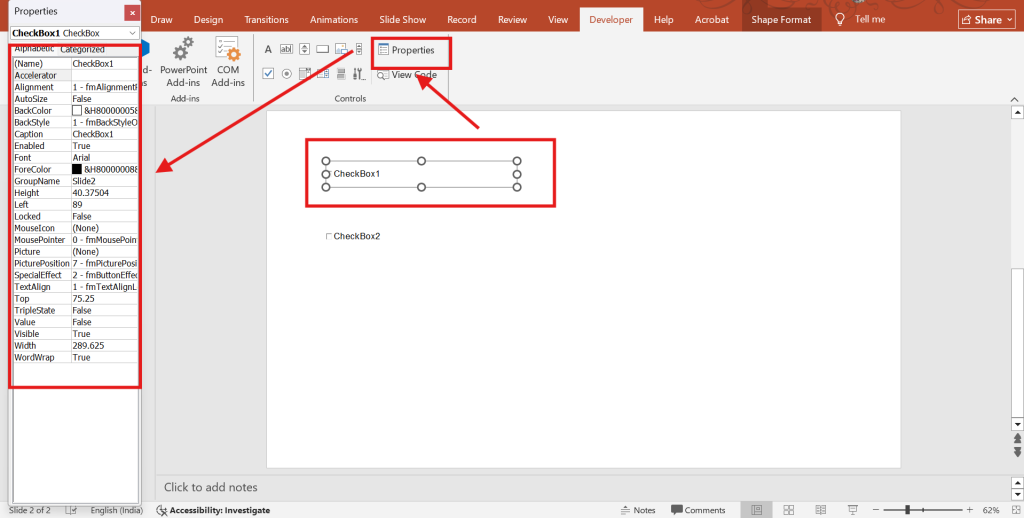
Step 3: Set Properties (Optional)
If you want to customise the checkbox, you can edit its properties.
- Select the checkbox you added.
- Then click on Properties in the Developer tab.
- A settings window will open where you can modify the checkbox text, adjust the font style, change colours, or rename the control.
This step is optional but useful if you want the checkbox to match your slide design or branding.
Step 4: Test the Checkbox
After placing and customising the checkbox, it is time to test it.
Start the slideshow by pressing F5 or clicking Slide Show. Once the presentation runs, you can click the checkbox to check or uncheck it.
Testing ensures the checkbox works properly and appears correctly during the presentation.
How to Add a Checkbox to Multiple PowerPoint Slides?
To add a checkbox to multiple PowerPoint slides at once, we recommend that you follow these steps:
Step 1: Enable the Developer Tab (Windows)
Before you insert clickable checkboxes, you need to enable the Developer tab since it is hidden by default.
- Go to File and click Options.
- Select Customize Ribbon from the left panel.
- On the right side, you will see a list of tabs. Check the box next to Developer and click OK.
Once enabled, the Developer tab will appear on your PowerPoint ribbon. This tab contains form controls, including checkboxes.
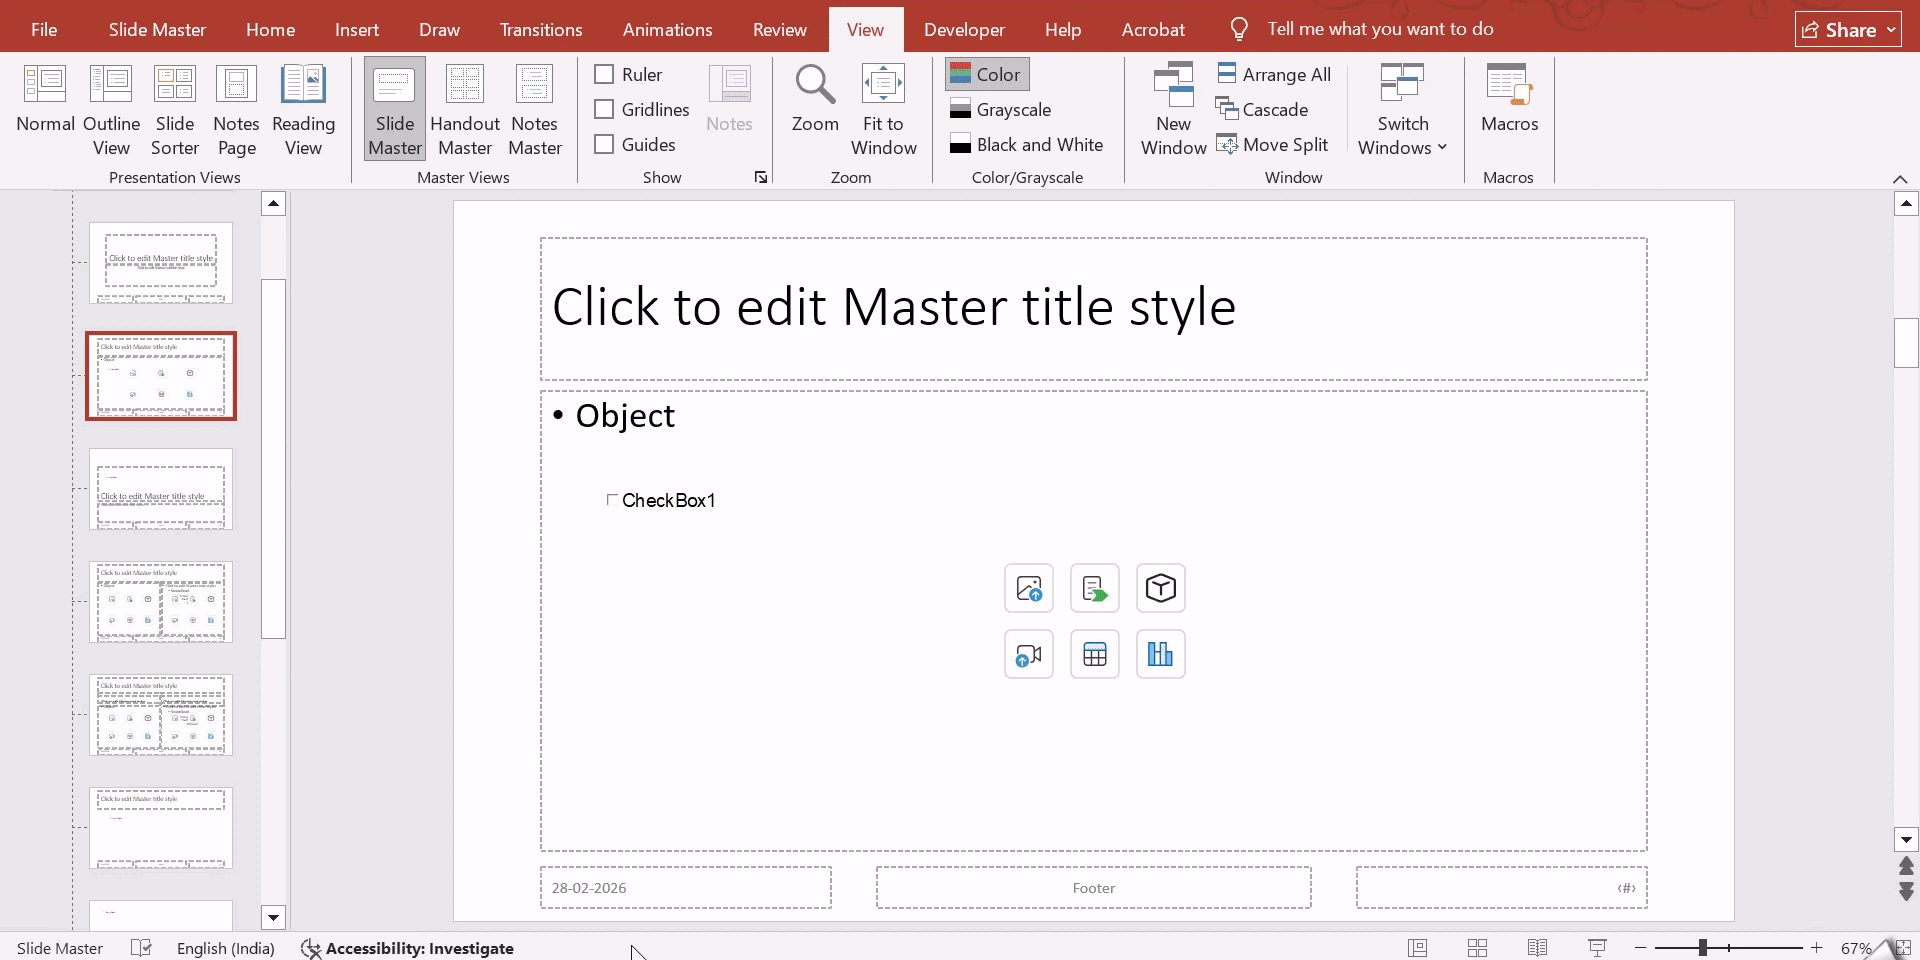
Step 2: Insert a Clickable Checkbox Using the Slide Master
If you want the checkbox to appear across multiple slides with the same placement and style, the Slide Master method is the most effective approach.
- Go to View and click Slide Master.
- Select the topmost slide, which is the main master layout.
- Open the Developer tab and click the Checkbox icon under Controls.
- Now draw the checkbox anywhere on the slide.
- You can right-click the checkbox and open Properties to edit the caption text. For example, you can rename it to Task 1, Completed, or Review Done.
Once done, close the Slide Master view. The checkbox layout will now reflect wherever that master layout is applied.

Step 3: Apply Checkboxes to Multiple Slides
If you do not want to rely only on the master layout, you can manually copy the checkbox to multiple slides at once.
- Go to View and open Slide Sorter.
- Select all slides where you want checkboxes. Use Ctrl + Click or Shift selection.
- Copy the checkbox you created earlier using Ctrl + C.
- Paste it onto the selected slides using Ctrl + V.
This method is helpful when only certain slides require checklists, rather than the entire presentation.
You can also insert symbol-based checkboxes.
- Go to Insert and click Symbol.
- Choose Wingdings or Wingdings 2 font.
- Pick checkbox symbols and insert them inside text boxes.
- Then copy and paste them across slides as needed.

Step 4: Format and Customize
Once checkboxes are added, formatting helps maintain a clean and professional look.
- Alignment: Select checkboxes and use Shape Format > Align > Distribute Vertically for even spacing.
- Consistency: If you are building a checklist presentation, define font style, size, and color from the Slide Master. This keeps every slide visually uniform.
- Non-Clickable: For simple visual checks, use Insert > Icons and search for “check” or copy/paste checkmark symbols (like from Wingdings font).
Also Read – How to Create a Checklist in PowerPoint?
Troubleshooting Common Issues with Adding Checkboxes in PowerPoint
1. Checkbox Not Clickable or Not Responding
One of the most common problems users face is that the checkbox simply does not respond when clicked. This usually happens when the presentation is still in edit mode. ActiveX checkboxes are interactive elements, so they only work when the slideshow is running.
Solution:
Make sure you are in Slide Show mode before trying to click the checkbox. Press F5 to start from the beginning or choose “From Current Slide.” If the checkbox still does not respond, check whether any text box, shape, or image is placed on top of it. If something is covering it, right click the checkbox and select “Bring to Front” so it becomes clickable again.
2. Duplicate Checkboxes or Linked Behavior
Sometimes when you copy and paste checkboxes across slides, they start behaving strangely. Clicking one checkbox may trigger another, or multiple boxes may appear linked. This usually happens with ActiveX controls because they carry embedded properties when duplicated.
Solution:
Avoid copying ActiveX checkboxes from one slide to another. Instead, insert a fresh checkbox each time. If you need a simpler and more stable option, use symbol-based checkboxes or trigger animations. These are easier to duplicate and maintain consistency across slides without technical glitches.
3. Missing Words or Graphics in ActiveX Checkboxes
Another issue users report is that text labels or graphics inside ActiveX checkboxes disappear during slideshow mode. Everything may look fine while editing, but elements go missing when presenting.
Solution:
This is often linked to hardware graphics acceleration. To fix it, go to File, then Options, then Advanced. Under the Display section, enable “Disable Slide Show hardware graphics acceleration.” Restart PowerPoint after making this change. This usually restores missing text and visuals inside the checkbox elements.
4. Add-ins or Software Interference
At times, the problem may not be with the checkbox itself but with external add-ins interfering with PowerPoint’s functionality. Certain add-ins can block or disrupt ActiveX controls, causing them to malfunction.
Solution:
Run PowerPoint in Safe Mode to test this. Press Windows + R, type PowerPnt /safe, and hit Enter. If the checkbox works fine in safe mode, the issue is likely caused by an add-in. Go to File, Options, then Add-Ins. Disable suspicious or unnecessary add-ins and restart PowerPoint normally.
Creating Stunning PowerPoint Presentations with SlidesAI
SlidesAI is an advanced AI PowerPoint generator designed to simplify how presentations are created across professional, academic, and business settings. It works as an add-in for Microsoft PowerPoint, allowing users to turn raw ideas, notes, or documents into complete slide decks within seconds. You can enter a topic, paste text, or upload files like PDF, TXT, or DOCX, and SlidesAI automatically structures the content, applies layouts, and designs visually polished slides. This removes the time spent on manual formatting and lets you focus on the message rather than slide design.
The tool is built for anyone who needs fast, clean, and professional presentations without spending hours arranging slides.
Key Features of SlidesAI include:
- Text-to-slide generation that converts written content into structured presentations
- Access to 50+ professional templates that can be customised to match branding
- AI image integration, along with built-in stock image support
- Multi-language support with instant translation into over 100 languages
- Document conversion from PDFs and text files into ready-to-use slides
- Flexible presentation formats for business, sales, conferences, and general use
- Advanced editing tools to rephrase, shorten, or remix slide content using AI
- Seamless export in PPTX format, compatible with both PowerPoint and Google Slides
Build Stunning Slides in Seconds with AI
- No design skills required
- 3 presentations/month free
- Don't need to learn a new software

Closing Thoughts
Adding checkboxes in PowerPoint might feel confusing at first, but once you know where to look and which method to use, it becomes quite straightforward. Whether you need clickable checkboxes for interactive slides or simple visual checklists for clarity, PowerPoint gives you enough flexibility to handle both. Try out the method that fits your presentation style, test it in slideshow mode, and keep your formatting consistent. With these steps, you can make your slides more organised, interactive, and easier for your audience to follow.