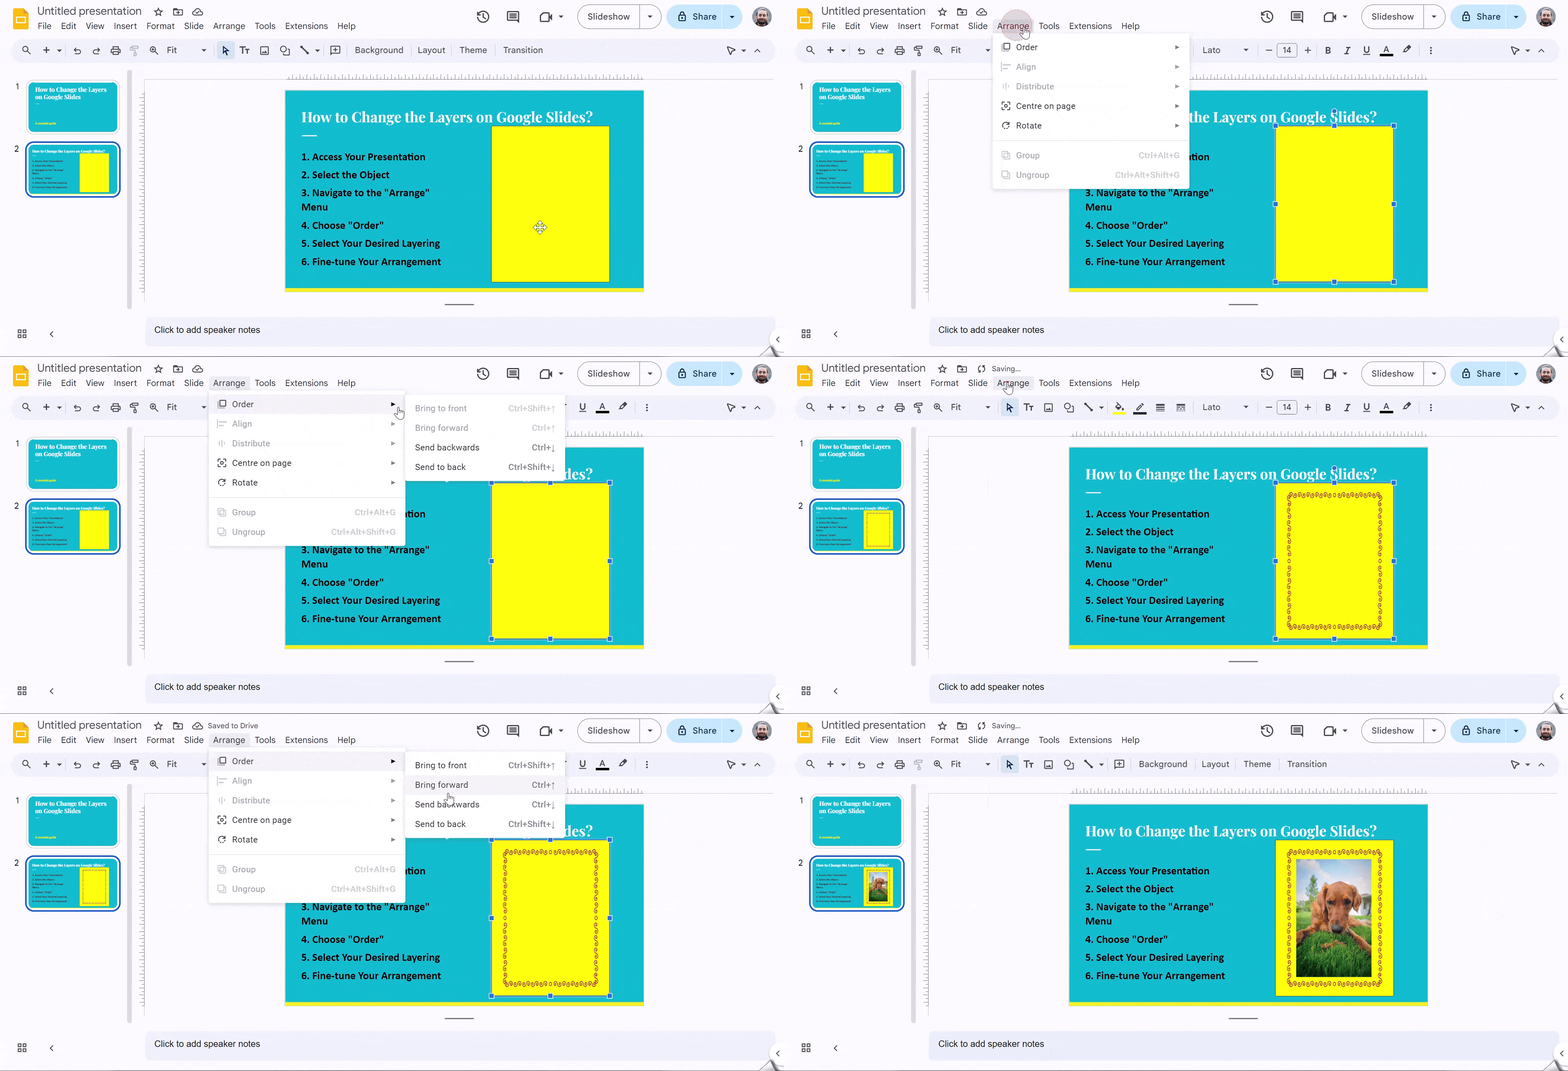
Layering in Google Slides is a technique where you can arrange objects on top of each other to create a visually appealing and organized presentation. Just like real-world layers, objects placed higher in the stacking order appear on top of those placed lower.
Using layers can significantly enhance your presentation’s design and readability. It allows you to:
- Create depth: By placing objects at different levels, you can make your slides more dynamic and visually interesting.
- Organize elements: Layering helps you keep your slides organized and clutter-free, making it easier for your audience to follow the flow of your presentation.
- Highlight important points: You can use layers to emphasize important information by placing it on top of other elements.
In this guide, we’ll walk you through the step-by-step process of changing layers in Google Slides. By the end, you’ll be able to confidently layer objects on your slides to create professional and engaging presentations.
How to Change the Layers on Google Slides?
To adjust the layering of objects in your Google Slides presentation, follow these steps:
1. Access Your Presentation: Begin by opening the specific Google Slides presentation that you want to edit.
2. Select the Object: Choose the object whose layering you wish to modify. This could be a shape, image, text box, or any other visual element.
3. Navigate to the “Arrange” Menu: Locate and click on the “Arrange” option in the top menu bar. This will reveal a drop-down menu with various layout options.
4. Choose “Order”: From the “Arrange” menu, select the “Order” sub-menu. This will present you with several options to adjust the layering of your selected object.
5. Select Your Desired Layering:
The “Order” submenu offers various options:
- Bring to Front: This places the selected object on top of all other elements on the slide.
- Bring Forward: Moves the object one layer upward, placing it above the element directly beneath it.
- Send Backward: Moves the object one layer downward, placing it behind the element directly above it.
- Send to Back: Places the object behind all other elements on the slide.
6. Fine-tune Your Arrangement: After selecting your desired layering option, you can continue making adjustments as needed. Experiment with different combinations to achieve the perfect visual composition for your presentation.
By following these steps, you’ll gain complete control over the layering of your Google Slides elements, allowing you to create professional and visually appealing presentations.

Mastered layering your elements? Now let our free AI presentation maker handle the slide creation for you—fast and effortlessly.
Create Presentations Easily in Google Slides and PowerPoint
15M+Installs

Quick Keyboard Shortcuts
- Bring Forward: Ctrl + Shift + Up Arrow (Windows) or Cmd + Shift + Up Arrow (Mac).
- Send Backward: Ctrl + Shift + Down Arrow (Windows) or Cmd + Shift + Down Arrow (Mac).
Related Read – Keyboard shortcuts for Google Slides
Closing Thoughts
Mastering layering in Google Slides can help you create more organized and engaging presentations. With a few simple steps, you can adjust the order of objects to highlight important points and add depth to your slides. Experiment with different arrangements to find what works best for your presentation style.
Related Read: How to Bring an Image Forward in Google Slides?
Frequently Asked Questions (FAQs)
1. Can I use layers to create depth in my slides?
Yes, by overlapping objects and adjusting their layer order, you can create a sense of depth.
2. What if I accidentally send an object to the back and can’t find it?
Use the Arrange menu to bring the object forward.
3. How can I select an object that is hidden behind other objects?
Use the Selection Pane (View -> Selection Pane) to identify and select hidden objects.
4. Can I use layers when collaborating with others on a Google Slides presentation?
Yes, layer changes are reflected in real-time for all collaborators.
5. How can I use layers to improve the overall design of my slides?
By carefully arranging objects on different layers, you can create visually appealing and organized slides.
6. Can I change the layer order of multiple objects at once?
Yes, you can select multiple objects and then use the Arrange menu to adjust their layer order together.
7. Will changing layer order affect the position of objects on the slide?
Changing layer order only affects the stacking order, not the actual position of objects on the slide.


