
Customizing default settings in Google Slides helps streamline your presentation process and ensures design consistency. Whether you update the default font, adjust colors, or set preferred layouts, making these changes saves time and keeps your slides professional. This guide will walk you through how to change Google Slide defaults quickly and easily.
Why Change Google Slides Defaults?
Changing the default settings in Google Slides can make your workflow smoother and your presentations more polished. Here’s why it matters:
- Save Time on Formatting: If you often find yourself changing fonts, colors, or layouts manually for every slide, updating the defaults means you won’t have to repeat those steps again and again.
- Maintain Visual Consistency: Consistent fonts and styles across all slides help your presentation look clean and professional. It is especially useful when you’re working on multiple decks or collaborating with a team.
- Reflect Brand Identity: For businesses, educators, or creators, setting defaults like brand fonts and colors helps every presentation align with your visual identity.
- Simplify Collaboration: When everyone on your team is working with the same default settings, it’s easier to maintain a unified look without spending time on corrections.
- Better First Impressions: A presentation that looks consistent from the first slide to the last can make your content more impactful and easier to follow.
How to Change the Google Slides Default Font?
If you want your slides to reflect a consistent look without manually updating fonts each time, changing the default font in Google Slides can save you time. Follow these simple steps:
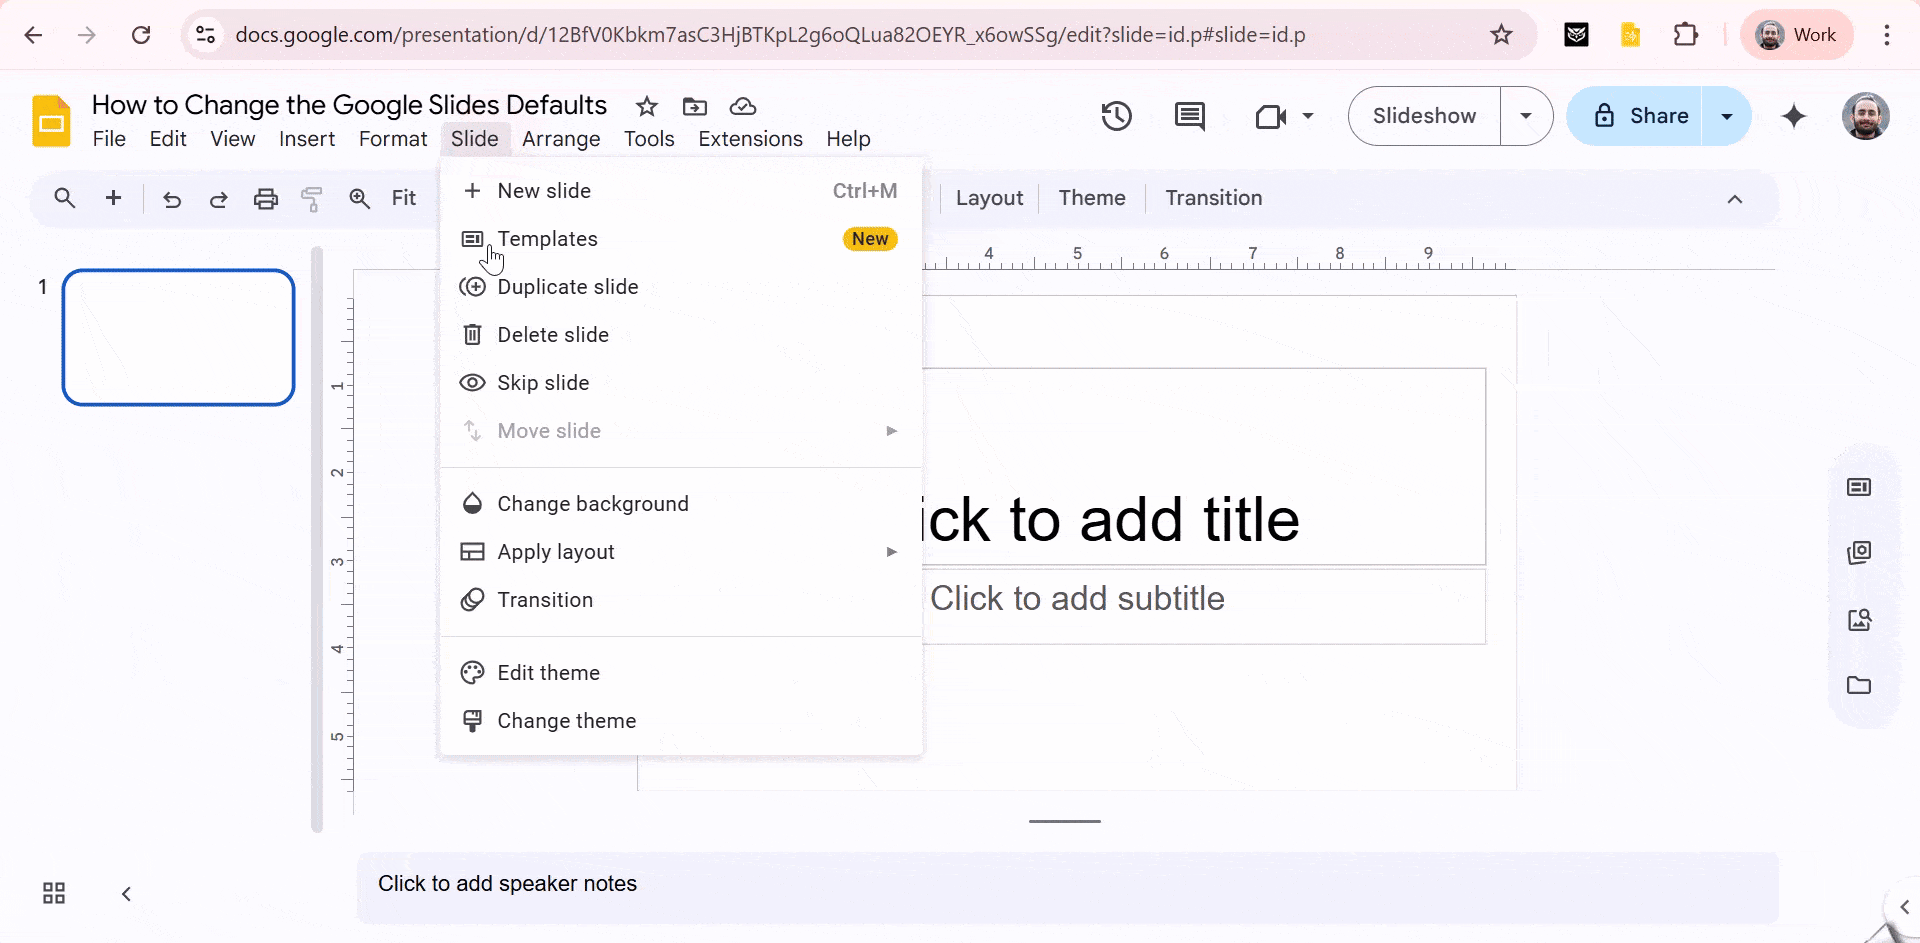
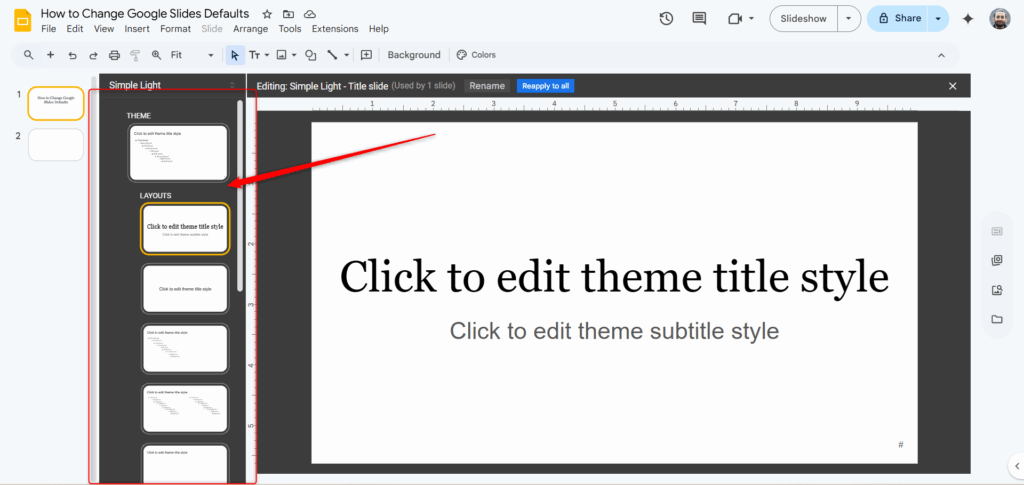
Step 1: Open the Theme Editor
With your presentation open, go to the top menu and click Slide > Edit theme. (In older versions, this option may be labeled as Master.)
Step 2: View the Theme Layouts
You’ll now see the main theme slide along with all its associated layouts. Selecting a layout shows how many slides in your presentation use it; this helps you identify which ones to update.
Step 3: Change the Title Font on All Slides
To update the title font across your deck, select the main slide at the top of the list. Click on the title text box and then use the toolbar at the top to choose a new font style.
Step 4: Update Fonts in Specific Layouts
If you want to customize fonts for particular slide types, like section headers or content slides, click the layout you want to edit, select the relevant text box, and apply your desired font using the toolbar.
Step 5: Save Your Changes
Once you’re done updating the fonts, simply click the X in the top right corner to close the theme editor. All slides using those layouts will now show your selected font changes.
How to Change Default Theme on Google Slides?
If you want your presentation to reflect your brand or match a specific style, changing the default theme in Google Slides is a great way to give your slides a consistent, professional look. Follow these steps to update it:
Step 1: Go to Slide > Edit theme
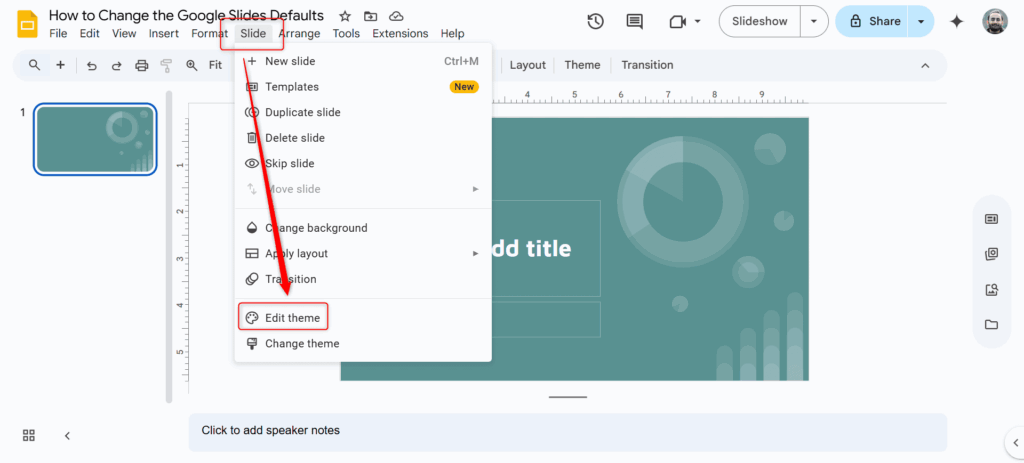
Open your Google Slides file, then click on the Slides menu at the top. From the dropdown, choose Edit theme. This opens the Theme Editor (previously called Master View), where you can make changes that will affect all slides in your deck.
Step 2: Choose or Customize the Theme
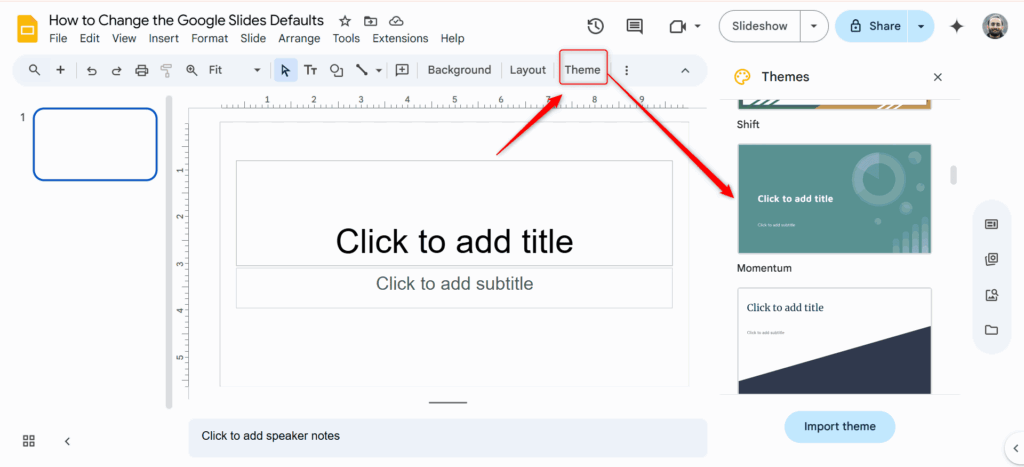
Inside the theme editor, you’ll see the main master slide at the top, followed by different layout options like title slide, title and body, and section header.
Here’s what you can do:
- Customize the current theme.
- Click the Theme button to explore and apply a different built-in theme.
- Add your own brand elements like a logo, background image, or footer text to the master slide.
Step 3: Set Fonts, Colors, and Layout Styles

You can personalize each layout by:
- Editing text boxes to change the font, size, and color.
- Moving or resizing placeholders, or adding new ones like subheadings.
- Changing backgrounds, adding shapes, or aligning content for a clean, uniform appearance.
Tip: Use the main master slide to apply changes across all slides and customize individual layouts to fine-tune specific slide types.
How to Change the Google Slides Default Layout?
If you want to tweak how your slides are structured by default, changing the layout helps you set the position of titles, content boxes, and other elements so every new slide matches your style.
Follow these simple steps:
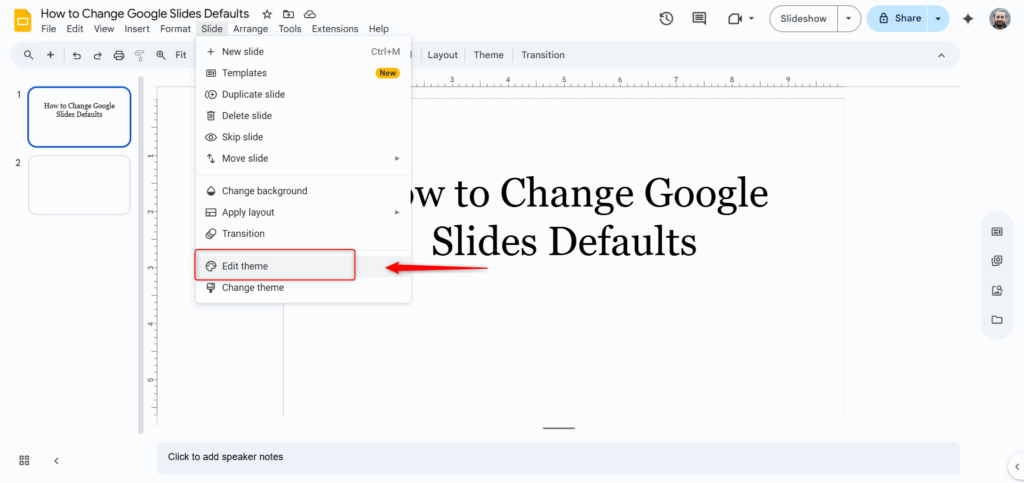
Step 1: Click on Slide > Edit theme
Open your presentation and head to the top menu. Click Slide and select Edit theme. (In some versions, you may find this as View > Theme Builder, both lead to the same tool.)
Step 2: Choose a Layout to Modify
On the left panel, you’ll see a list of layouts like title slide, title and content, section header, etc. Click on the one you want to customize. These layouts are what you apply to individual slides while editing your deck.
Step 3: Customize the Layout
Now you can make any changes you want, such as:
- Repositioning or resizing text boxes and placeholders
- Changing fonts, text size, or alignment
- Modifying the background color or adding images or shapes
These updates will reflect every time that specific layout is used in your presentation.
Step 4: Close the Theme Editor
Once you’re done, simply click the X button on the top-right of the theme editor. Your updated layouts are now saved and ready to use.
Tip: Modifying a layout ensures consistency across your slides without having to manually adjust each one.
Create Professional Slides with SlidesAI
While changing Google Slides defaults helps streamline formatting, SlidesAI takes things a step further by helping you build complete presentations fast.
Instead of spending hours writing content and structuring slides, just input your ideas into SlidesAI, and it turns them into professional, ready-to-present slides in seconds.
Here’s how you can do it:
Step 1: Install the SlidesAI Add-on
Click here to install SlidesAI from the Google Workspace Marketplace.
Step 2: Open Google Slides
Go to Extensions > SlidesAI.io: Create Slides with AI > Generate new slides.
Step 3: Enter Your Topic
Choose the “Topic” option in the SlidesAI panel and type in your presentation topic.
Step 4: Set Your Presentation Options
- Presentation Type – Choose the format that suits your content
- Audience – Define who the presentation is for
- Tone – Pick a tone (e.g., formal, conversational, informative)
- Language – Select the language you want your slides in
- Additional Instructions – Add specifics like charts, financials, or a conclusion slide
Step 5: Choose the Context
Decide how your slides will be used:
- Presenting Live – for concise, speaker-friendly slides
- Sending to Read – for detailed, self-explanatory content
Step 6: Edit the Outline and Slides
Review the generated slide outline. You can edit, remove, or add headings as needed.
Step 7: Final Touches
Pick a template, upload your logo, and choose whether to include AI-generated or web images.
That’s it, your complete presentation will appear in Google Slides, fully customizable and ready to go.
SlidesAI makes professional presentations easier than ever.
Create Presentations Easily in Google Slides and PowerPoint
14M+Installs

Frequently Asked Questions on Changing Google Slides Defaults
Can I set a default theme for all my Google Slides presentations?
Not exactly. Google Slides doesn’t have a built-in option to set a universal default theme across all your presentations. But there’s a simple workaround: you can create a custom slide deck with your preferred theme and design, save it, and make a copy every time you start a new presentation. It works just like a personal template.
Can I import a PowerPoint theme and use it as a default in Google Slides?
Absolutely! Just upload your PowerPoint (.pptx) file to Google Drive, open it with Google Slides, and the theme will stay intact. You can even tweak it and save it as your go-to template for future use.
How do I add my logo or watermark to every slide by default?
Easy, just head to the Theme Editor (Slide > Edit theme), select the master slide, and insert your logo or watermark there. It’ll automatically show up on every slide that uses that layout.
Can I change the default alignment or spacing for text?
Yes, you can! Open the master slide or any layout in the theme editor, click on the text box, and use the toolbar to adjust alignment, line spacing, and more. Whatever you set there will apply to all slides using that layout.