
Sometimes you might want to save a picture from a PowerPoint slide, maybe it’s a logo, a photo, or a graphic you want to reuse somewhere else. The good news is, PowerPoint makes it easy to save images without losing quality. In this guide, we’ll show you quick and simple ways to export pictures from PowerPoint so you can use them wherever you need.
How to Save a Picture from PowerPoint?
There are 3 ways to save a Picture from PowerPoint
Method 1: Using PowerPoint “Save as Picture” Option: Best for Single Image Extraction
If you just want to save a picture from PowerPoint or a shape from your PPT slide, this is the easiest way. It keeps the image quality good, and you can choose the file type you want.
Steps:
- Open your PowerPoint file and go to the slide with the picture you want to save.
- Click on the picture, shape, or graphic to select it.
- Right-click on the image.
- From the menu that pops up, click Save as Picture.
- Choose where you want to save the file on your computer.
- Pick a file format (like PNG or JPEG) from the dropdown list. PNG is usually best for clear images.
- Give your file a name and click Save.

Create Presentations Easily in Google Slides and PowerPoint
14M+Installs

Method 2: Using .zip File Extension, Best for Exporting High-Resolution Images from PowerPoint
If you want to save all the images from a PowerPoint at once and keep them in their original high quality, this method is a great choice. It works by turning your PowerPoint file into a zip folder so you can grab the images directly.
Steps:
- Find your PowerPoint file on your computer (it should be saved as a .pptx file).
- Right-click on the file and choose Rename.
- Change the file extension from .pptx to .zip (for example: presentation.pptx becomes presentation.zip)
- Hit Enter, and confirm the change if your computer asks.
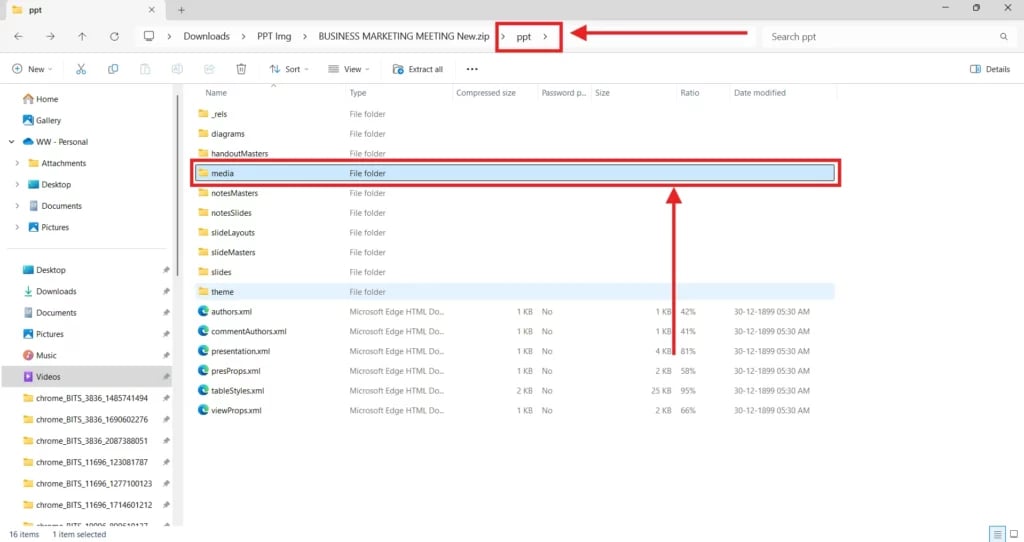
- Double-click the new .zip file to open it.
- Go into the folder called ppt, then open the media folder.
- Inside, you’ll see all the images used in your PowerPoint, saved as separate files (like PNG or JPEG).
- Copy the images you want and paste them anywhere on your computer.
Method 3: Using Online Extractors, Quickest Method
This is the quickest method to extract images from your PowerPoint presentation.
Steps
- Go to GroupDocs’ PowerPoint Image Extractor.
- Upload your PowerPoint presentation; it will automatically start parsing the file.
- Once the images are extracted, you can download them as a .zip file.
It’s a fast and hassle-free way to save all visuals from your slides in one go.
If you’re a Google Slides user, learn how to save images from Google Slides here.
How to Save a Picture from PowerPoint on Mac?
If you’re using PowerPoint on a Mac, the steps are slightly different:
- Open your PowerPoint presentation.
- Click the image you want to save.
- Control-click (or right-click) on the image.
- Select Save as Picture.
- Choose your file format (PNG recommended).
- Click Save.
Build Stunning Slides in Seconds with AI
- No design skills required
- 3 presentations/month free
- Don't need to learn a new software

How to save as a picture in PowerPoint is simple once you know the right method. Whether you need just one image or want to grab all visuals from a presentation, there’s an option that fits your needs, from right-click saving to using .zip files or online tools. By following these steps, you can quickly reuse images without losing quality and make your work easier.
Frequently Asked Questions
Why save a picture from PowerPoint?
Saving a picture from PowerPoint allows you to use visuals outside of the presentation itself, maintain the quality of the visuals, and protect your content from editing. It’s useful for sharing key visuals, using them in other documents, or incorporating them into social media posts without compromising the presentation’s design.
Why is “Save as Picture” not working in PowerPoint?
If the “Save as Picture” option isn’t working, it could be due to PowerPoint glitches, outdated software, or issues with the image or object format. Try restarting PowerPoint, updating your software, or copying the object to a new slide and trying again. Also, ensure you’re right-clicking on an actual image or grouped object; you can try the other methods above.
What is the best format to save a picture from PowerPoint?
The best format depends on your use case. For high-quality images, PNG is recommended due to its lossless compression. Use JPG for smaller file sizes if quality is less critical. TIFF is ideal for print, and SVG works well for vector-based graphics.
How can I save a cropped picture in PowerPoint?
To save only the cropped portion of an image:
- Right-click the cropped image and choose “Save as Picture”.
- PowerPoint will export the image as it appears (cropped). If you’re still seeing the full image, go to Picture Format > Compress Pictures, and check “Delete cropped areas of pictures” before saving.
How do I change the quality of a picture saved from PowerPoint?
By default, PowerPoint saves images at 96 DPI. To increase the quality (e.g., to 300 DPI), you can edit a registry setting:
- Press Windows + R, type regedit, and press Enter.
- Go to: HKEY_CURRENT_USER\Software\Microsoft\Office\16.0\PowerPoint\Options
- Right-click > New > DWORD (32-bit) Value → name it ExportBitmapResolution.
- Double-click it, set Base to Decimal, and Value to 300.
- Click OK and restart PowerPoint.
This will export high-resolution images from PowerPoint. Alternatively, you can use an online converter to enhance image quality after exporting.
How to save a picture with text on PowerPoint?
Simply select your text and image together by holding the Shift key, right-click, choose “Save as Picture,” and save the file.
How to save a PowerPoint slide as a picture?
Go to File > Export, change the file type to an image format like PNG or JPG, then click Export. Choose “Just This One” to save the current slide, or select “All Slides” to save every slide as separate images. Read more on this here: Save a PowerPoint Slide as an Image in Just 4 Steps