Making your Google Slides presentation more interesting is easy when you add drawings. You can use the Scribble tool right in Google Slides to draw lines or circles for emphasis. If you want to make more detailed drawings, like shapes or illustrations, you can use Google Drawings, which is a part of Google Drive.
Then, you just insert your drawing into Google Slides. There’s also a free tool called Annotate that works with Chrome, letting you write or draw directly on your slides.
This guide will show you how to do all of this on a desktop or laptop, so without waiting further let’s dive in.
How will a Drawing Help in Enhancing the Presentation?
Adding drawings to your Google Slides presentation brings a layer of creativity and personalization that standard text and images often can’t match. Whether it’s a quick sketch, a hand-drawing, or a custom shape, drawings help convey ideas more visually and engagingly.
They’re especially useful when you want to:
- Highlight specific points or areas on a slide
- Add visual interest to otherwise static content
- Create diagrams or flowcharts quickly without needing external tools
- Personalize your slides with handwritten notes, arrows, or doodles
- Simplify complex concepts using visuals
Drawings can make your presentation feel more dynamic, approachable, and tailored to your audience, which is perfect for both classroom and professional settings.
Methods to Draw on Google Slides
Google Slides may not have a built-in drawing canvas, but there are a few easy ways you can still add drawings to your presentation. Here are three popular methods you can try:
There are three main ways you can learn how to draw on Google Slides:
- Using the Scribble Tool in Google Slides
- Using Google Drawing Tools
- Using The Annotate Extension Add-on
Method 1: Using the Scribble Tool in Google Slides
Want to add a personal touch to your Google Slides? Look no further than the scribble tool! It lets you draw freehand directly on your slides, adding a touch of creativity and visual interest in just a few clicks. Let’s explore how to use this handy tool.
1. Open your desired slide:
- Go to your Google Drive and open your presentation.
- Select the slide where you want to draw.
2. Access the scribble tool:
- Go to the top menu bar and click on “Insert.”
- A dropdown menu will appear. Navigate to “Line” and then choose “Scribble.”
3. Start drawing:
- Clicking “Scribble” will change your cursor into a crosshair.
- Click and hold your mouse button on the slide where you want to start drawing.
- Drag your mouse to create your desired shape or line.
- As you draw, the line will appear continuously.
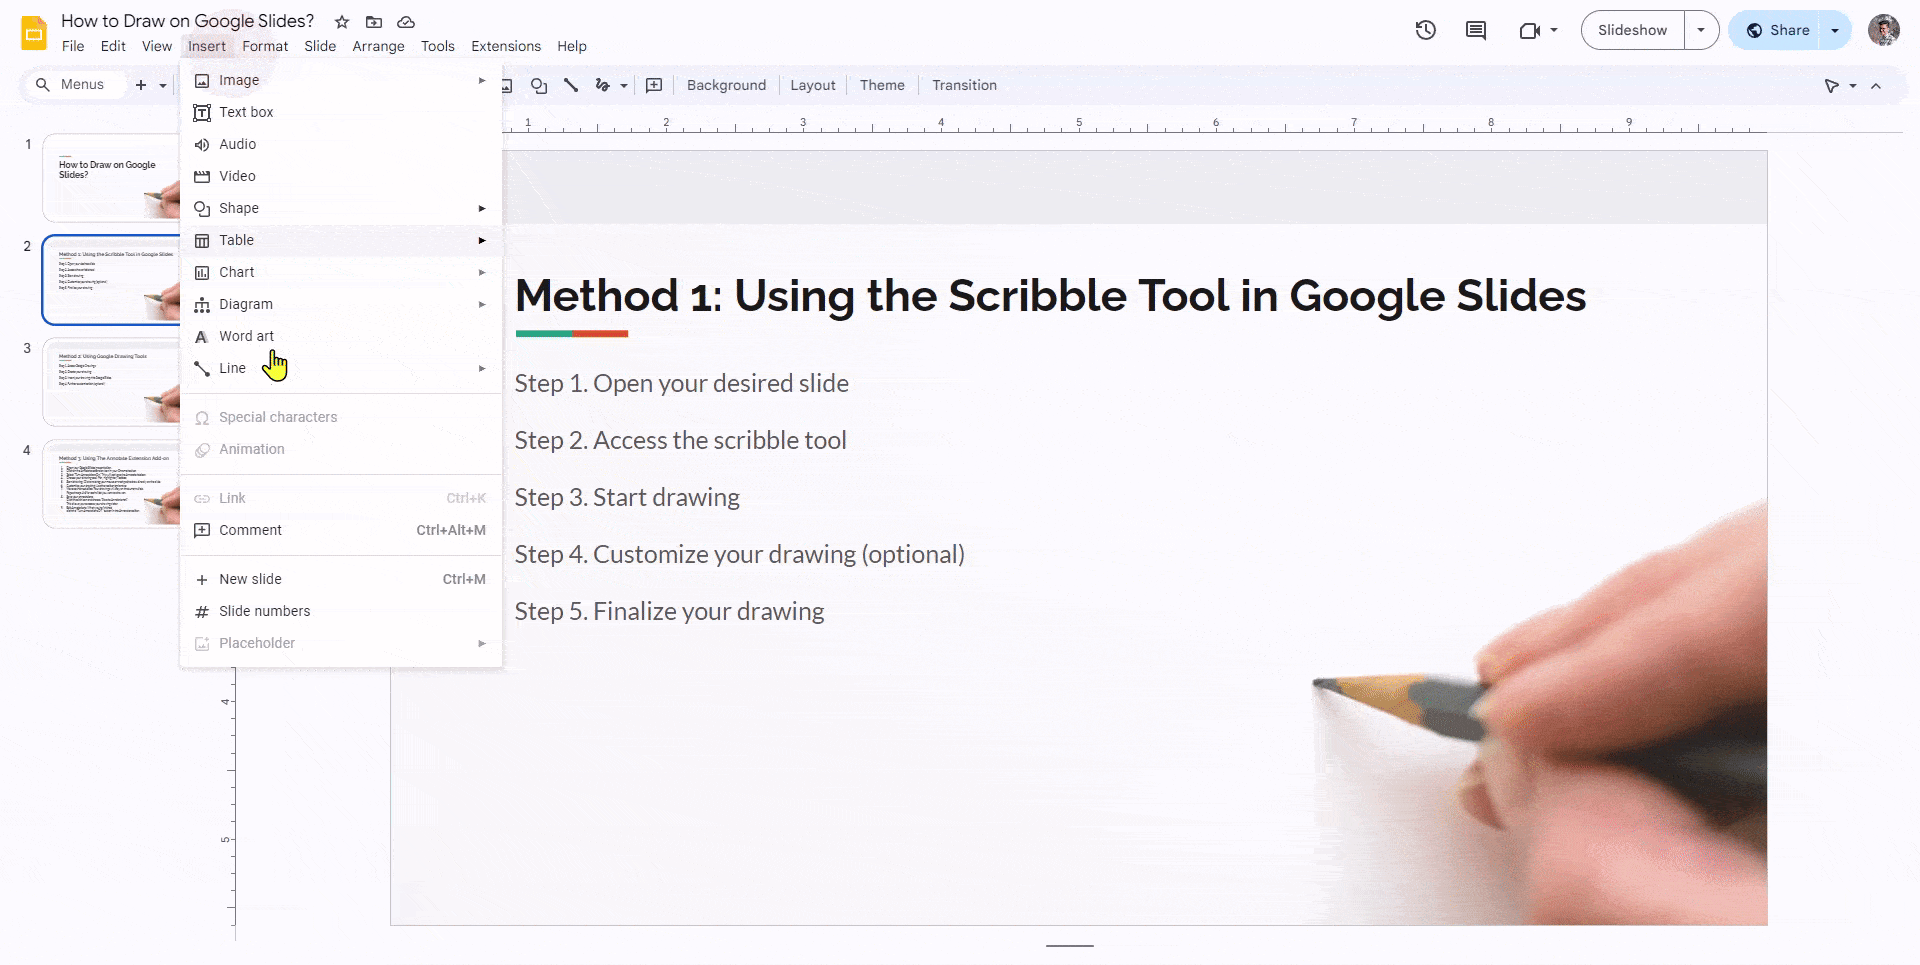
4. Customize your drawing (optional):
- Change line color: Select the drawn line and click the line color icon in the toolbar. Choose your desired color.
- Adjust line weight and style: Click the line weight and style icon in the toolbar. You can choose different thicknesses and dashed lines.

5. Finalize your drawing:
- Once you’re finished drawing, simply release the mouse button.
- Your drawing will appear as a selected object on the slide. You can now move, resize, or edit it further using the options on the toolbar.
Here are some additional tips for using the scribble tool:
- You can draw simple shapes like circles and squares by holding down the Shift key while dragging your mouse.
- You can use the undo and redo buttons in the toolbar to correct any mistakes while drawing.
Method 2: Using Google Drawing Tools
While the scribble tool is great for quick freehand drawings, Google Slides offers another option for more precise and complex drawings – Google Drawings. Here’s how to use it:
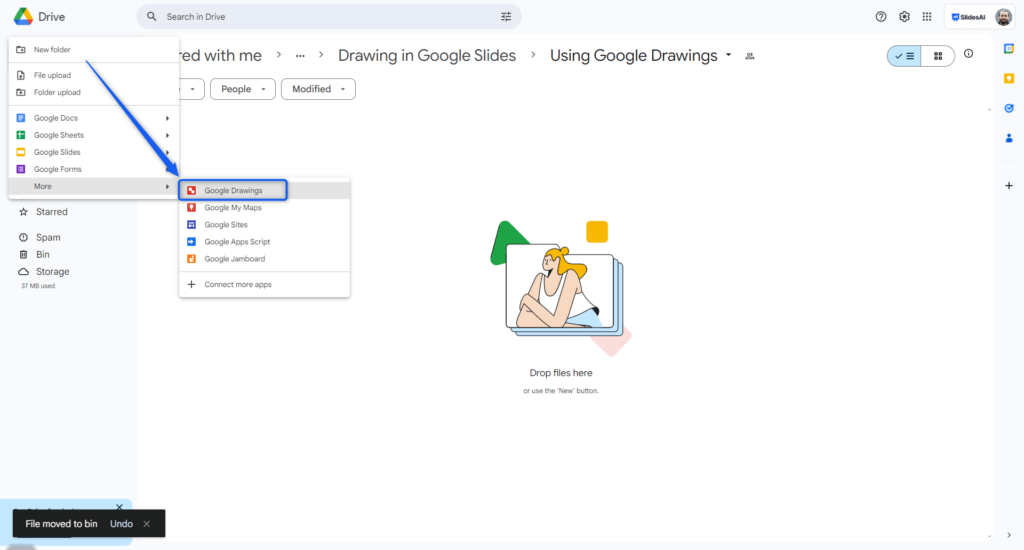
Step 1: Open your Google Drive.
Step 2: Click “New” and then select “More” from the dropdown menu.
Step 3: Choose “Google Drawings.”
Step 4: A new tab will open for Google Drawings. Here, you can use various shapes, lines, and other drawing tools to create your desired image.
Step 5: Once you’re finished with your drawing, give it a name.
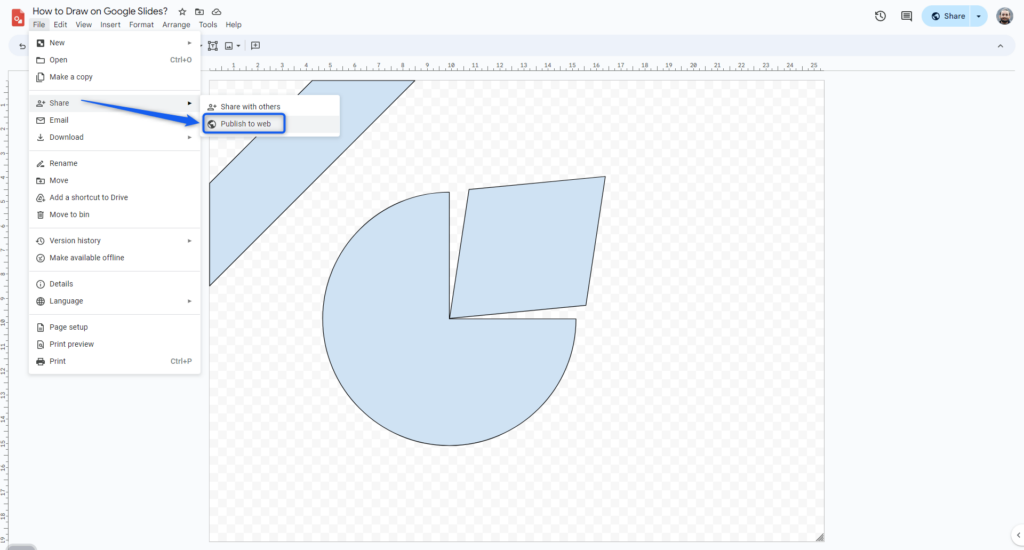
Step 6: Go to “File” and then click “Share.”
Step 7: Select “Publish to the web” and click “Publish” to get a link to your drawing.
Step 8: In your Google Slides presentation, go to “Insert” and then “Image.”

Step 9: Paste the link to your drawing from Google Drawings and click “Insert.”
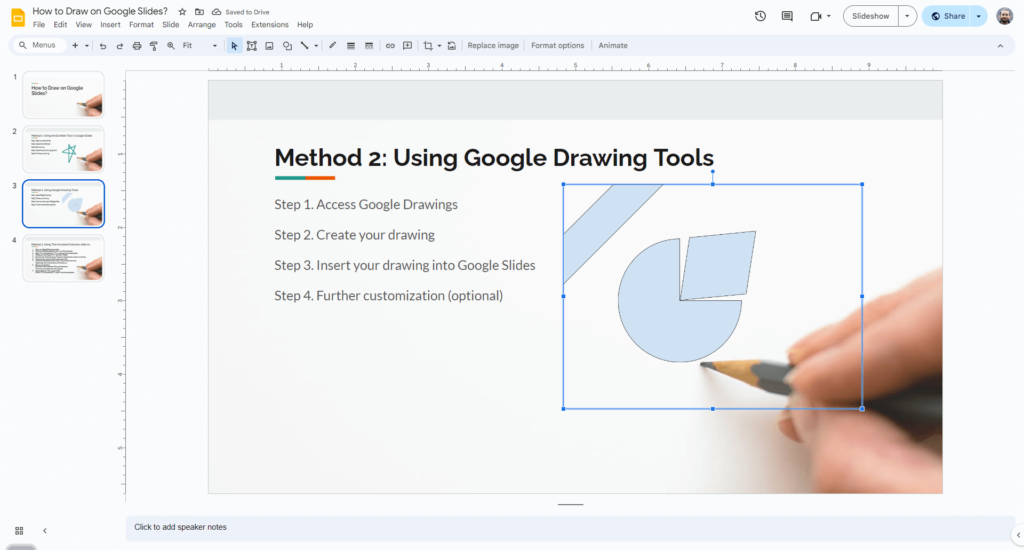
Google Drawings offers more flexibility and control for creating complex drawings. You can edit the drawing further after inserting it into your slide by double-clicking on it and making changes in Google Drawings.
Method 3: Using The Annotate Extension Add-on
Before you begin:
- Make sure you have Google Chrome installed on your computer.
- Install the Annotate extension for Chrome from the Chrome Web Store
- Create an account on Annotate.net (a free account that works for basic drawing features).
Steps:
Step 1: Open your Google Slides presentation.
Step 2: Click on the Annotate extension icon in your Chrome toolbar.
Step 3: Select “Turn Annotations On.” This will activate the Annotate toolbar.
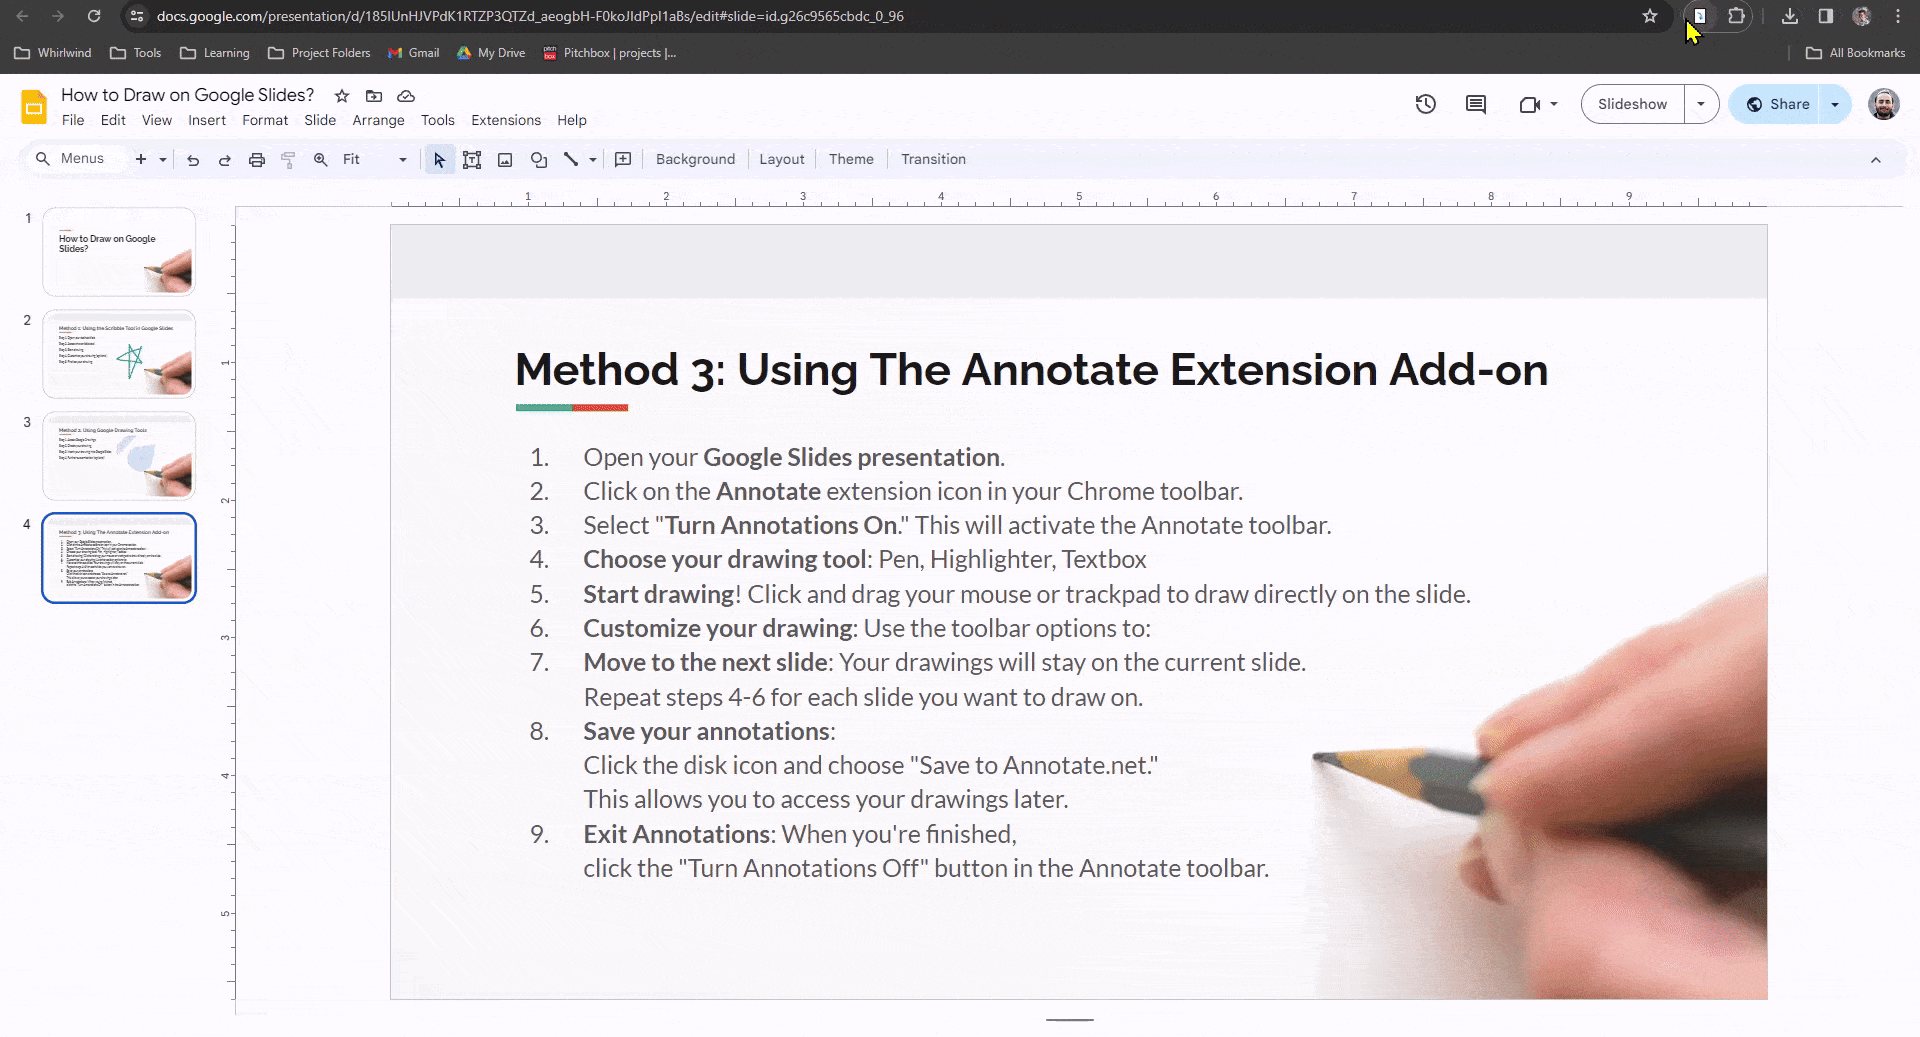
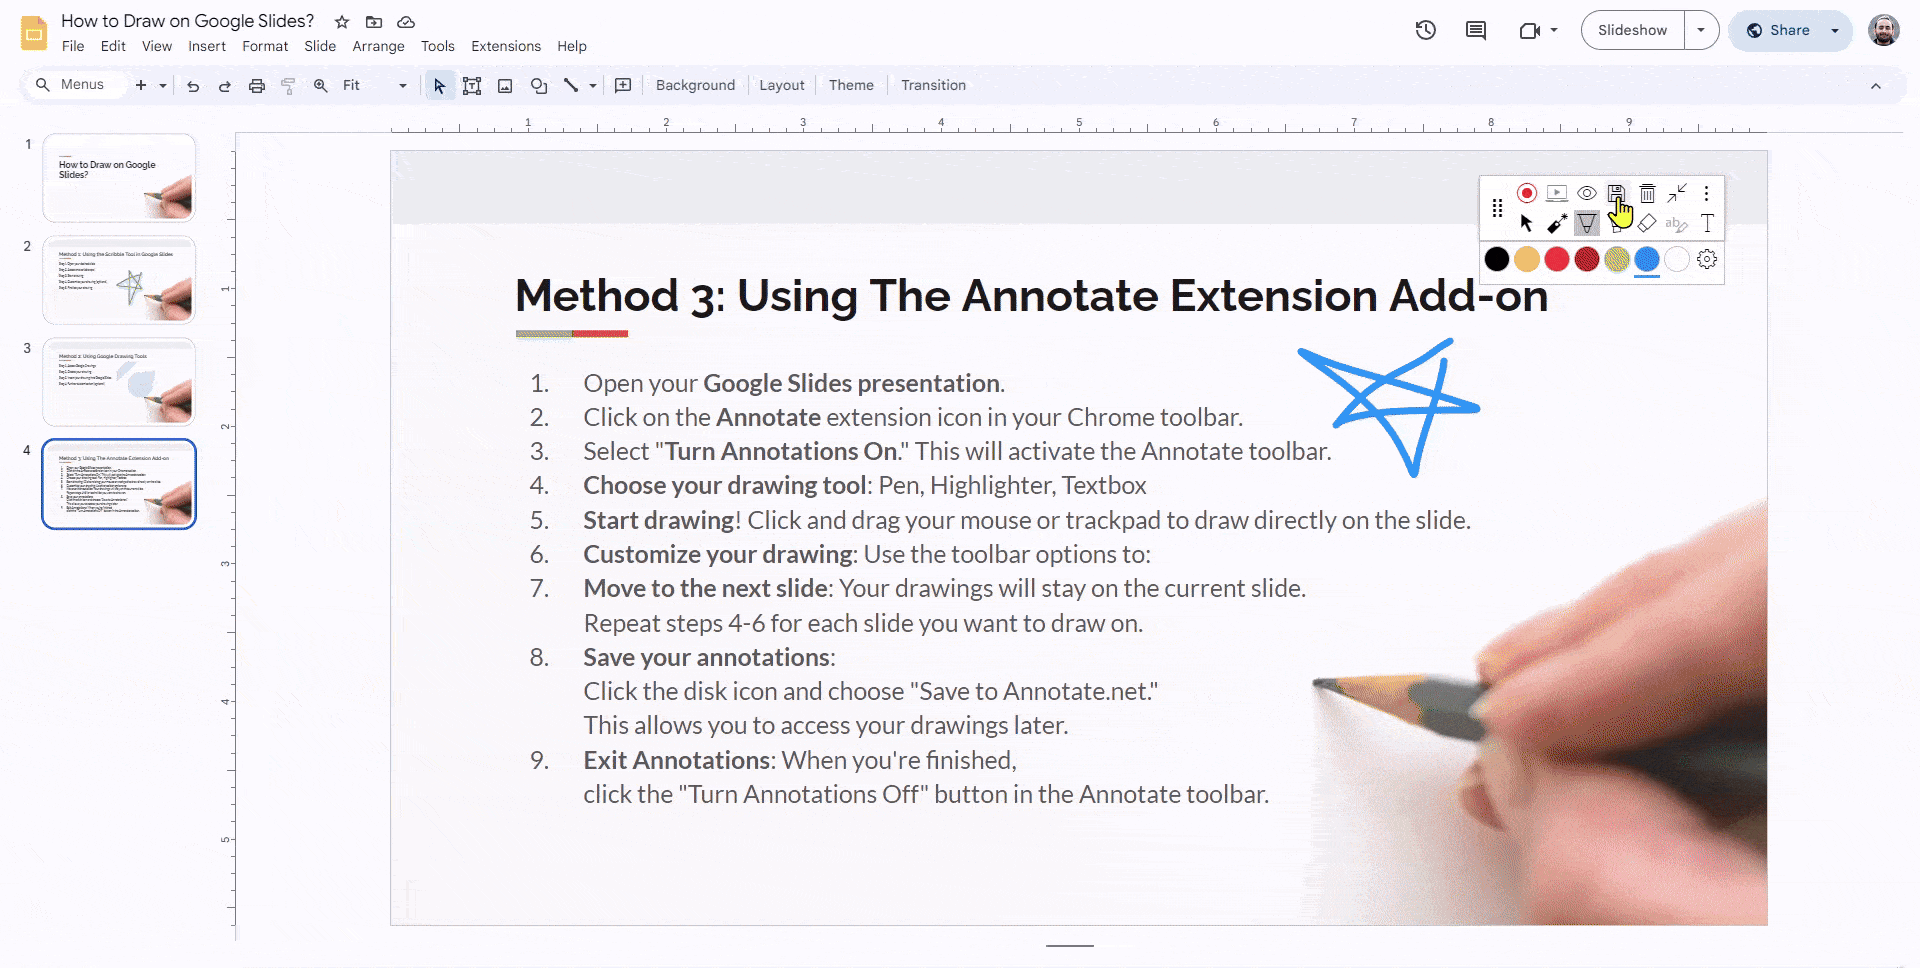
Step 4: Choose your drawing tool:
- Pen: Click the pen icon to draw freehand lines in various colors and thicknesses.
- Highlighter: Click the highlighter icon to highlight existing text or images.
- Text box: Click the text box icon to add a text box anywhere on the slide and type a message
Step 5: Start drawing! Click and drag your mouse or trackpad to draw directly on the slide.
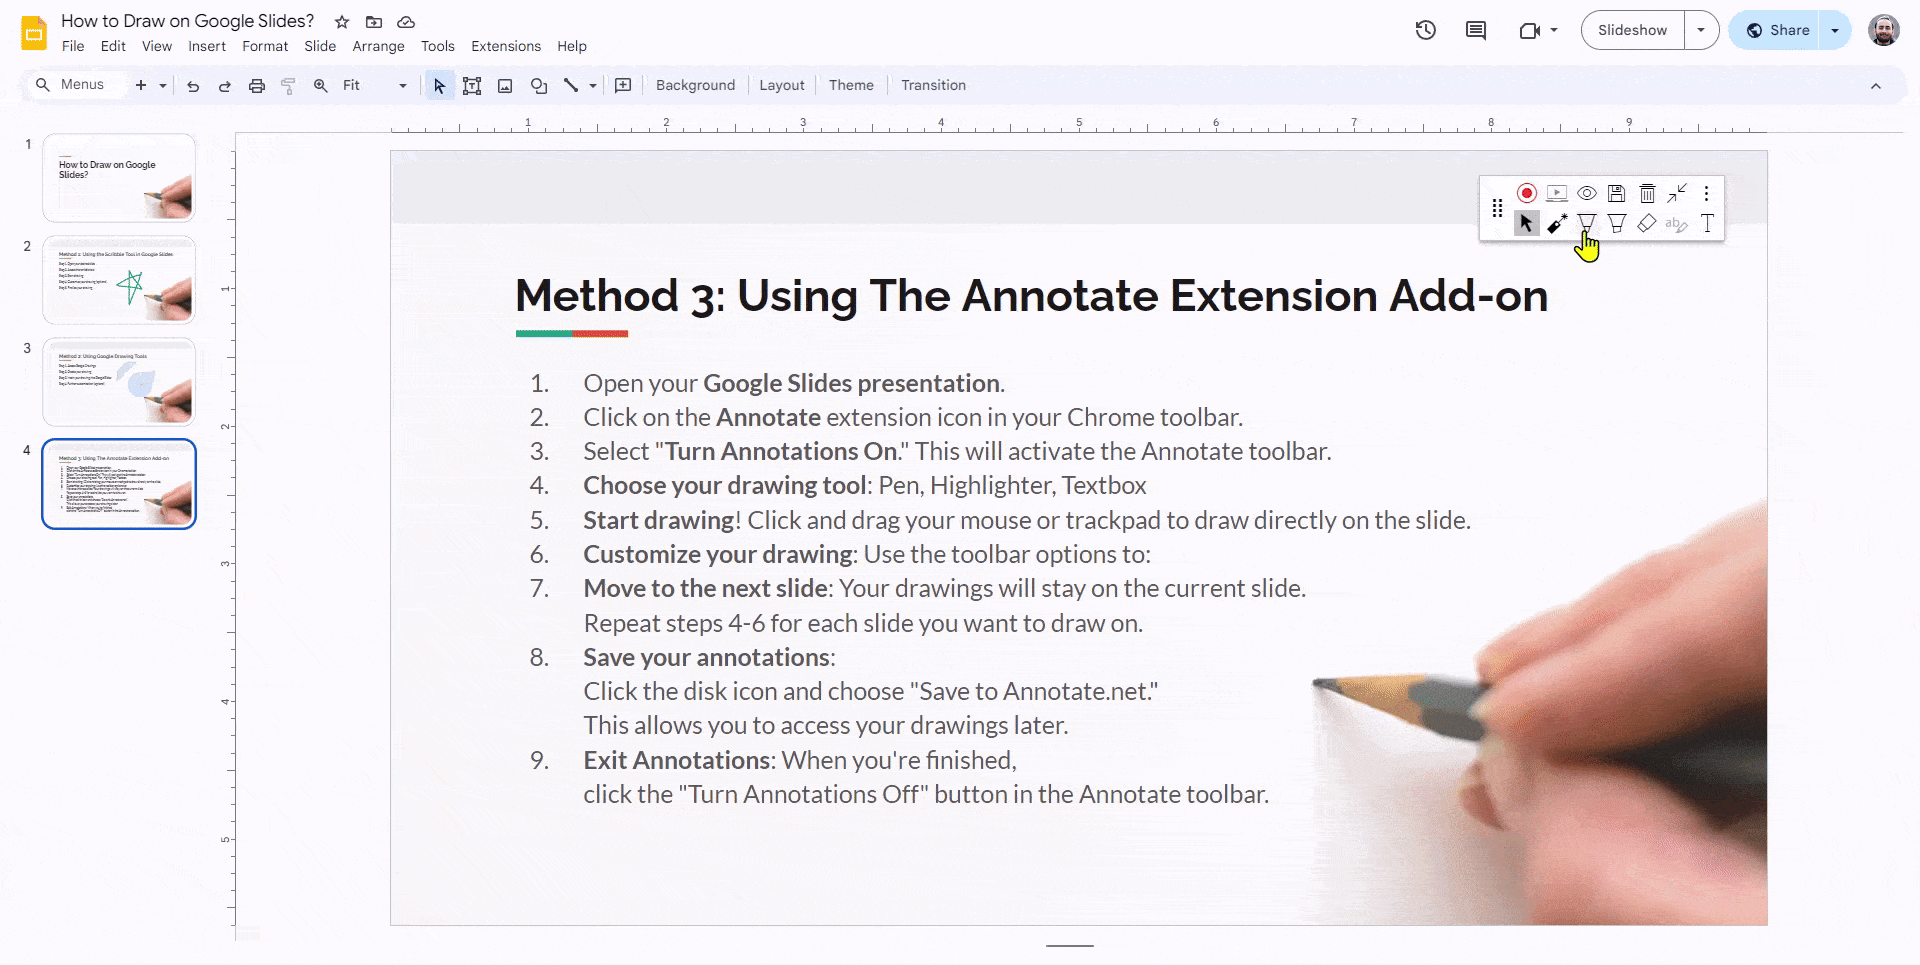
Step 6: Customize your drawing: Use the toolbar options to:
- Change the color: Click the color palette icon and choose a color.
- Adjust the thickness: Use the up and down arrows next to the color palette.
- Undo/redo: Click the undo and redo arrows.
- Erase: Click the eraser icon and drag over your drawing to erase it.
Step 7: Move to the next slide. Your drawings will stay on the current slide. Repeat steps 4-6 for each slide you want to draw on.
Step 8: Save your annotations: Click the disk icon and choose “Save to Annotate.net.” This allows you to access your drawings later.
Step 9: Exit Annotations: When you’re finished, click the “Turn Annotations Off” button in the Annotate toolbar.
Pro Tips:
- You can use the laser pointer tool to highlight specific areas during presentations.
- Annotate offers additional features like shapes, images, and screenshots in paid plans.
- Remember, your drawings are overlays, and don’t permanently modify the original slide content.
By following these steps, you can easily draw on your Google Slides presentations using the Annotate extension for Chrome. Happy annotating!
Method 4: Drawing During a Presentation
If you want to draw directly on your slides while presenting, use this method! Google Slides has a built-in pen tool that lets you annotate live during your presentation, perfect for emphasizing key points or adding quick sketches on the spot.
Here’s how to use it:

Step 1 : Start your presentation
Open your Google Slides file and click the Slideshow button in the top-right corner to enter presentation mode.
Step 2 : Access the pen tool
Once in the slideshow view, move your mouse to the bottom-left corner of the screen to reveal the control bar.
Click on the three dots (⋮) to open the options menu.
Step 3 : Turn on the pen
From the menu, select “Turn on the pen.”
Alternatively, you can quickly enable it using the keyboard shortcut Shift + L.
Step 4 : Start drawing
Your cursor will now turn into a drawing pen.
Click and drag your mouse (or trackpad) across the slide to draw lines, highlight points, or make notes as you speak.
Step 5 : Stop drawing
When you’re done, open the same menu and choose “Turn off pen” or switch back to the default cursor.
Pro Tip:
Use this feature to circle, underline, or annotate directly during your talk. It helps keep your audience engaged and focused on the parts you’re discussing.
Tips for Effective Drawing in Google Slides
Want your drawings to look clean and professional in your slides? Here are a few handy tips to make the process smoother and your visuals more impactful:
- Group Objects: Select multiple shapes or lines, then click Arrange > Group to move or resize them together.
- Adjust Layering Order: Use Arrange > Order to bring shapes forward or send them backward for clean layering.
- Use Transparency: Adjust the transparency of shapes to create layered effects and make your slides visually appealing.
- Practice Regularly: Experiment with Google Slides’ drawing tools to improve accuracy, speed, and confidence.
Think of it as sketching with digital tools, fun, creative, and easier every time you use them!
There you have it! Drawing on Google Slides is a fun way to spice up your presentations. Whether you’re sketching freehand or creating complex designs, these methods have you covered. So, get drawing and make your slides stand out!
Build Stunning Slides in Seconds with AI
- No design skills required
- 3 presentations/month free
- Don't need to learn a new software

Frequently Asked Questions On How to Draw on Google Slides
1. Can I draw freehand in Google Slides?
You can draw freely on your Google Slides! The easiest way is to plug in a drawing tablet and use it instead of your mouse. Just like drawing on paper, but on your slides!.
2. Does Google have a draw app?
Yes! You can create flowcharts, diagrams, and other online visuals using Google’s drawing apps.
3. How do you draw on Google Slides on iPhone/iPad?
Draw live on iPhone/iPad Slides: Tap “Present,” choose display, then “Draw.” Use your finger to draw, tap “Clear drawing” to erase, swipe to change slides, and tap “Draw” again to exit.
4. How do I delete a drawing in google slides?
Click the drawing and hit Delete, or right-click and choose Delete.
5. Can I edit the drawing after I’ve inserted It into the slide?
Yes, you can. Double-click on the drawing to reopen the drawing canvas. Make the necessary changes and click “Save and Close” to update the drawing on the slide.
6. Can multiple people work on Google Slides at the same time?
Yes, you can have up to 100 people view, edit, or comment on Google Slides at once.
7. Where is the pen tool in Google Slides?
In slideshow mode, hover over the bottom left corner and click the three dots to access “Turn on pen” and draw on your slides.
8. How to draw on Google Slides while presenting
During your presentation, enter slideshow mode and access the three-dot menu in the bottom left corner. Enable “Turn on pen” to draw directly on your slides.
9. Is there a paintbrush tool in Google Slides?
No, Google Slides doesn’t have a dedicated “paintbrush” tool like some design programs. While you can’t directly draw freely, the “Turn on pen” feature in slideshow mode allows you to write or draw annotations on your slides during presentations.
10. Can I change the color of a scribble or drawing in Google Slides?
Yes! Just click on the scribble, then use the toolbar at the top to change the line color or adjust the thickness. Super simple!
11. How do I rotate or resize a drawing?
Click the drawing, then drag the blue squares (resize handles) to make it bigger or smaller. To rotate, use the little circular handle at the top.
12. Can I layer multiple drawings or images?
Absolutely! Use Arrange > Order to move your drawings or images forward or backward, like stacking layers on top of each other.
13. How can I trace over an image in Google Slides?
Insert your image first, lower its transparency, and then grab the Scribble tool to draw right over it. Perfect for sketching or annotations!
14. Are there any keyboard shortcuts for drawing tools?
There aren’t shortcuts specifically for drawing, but pressing Alt + I + L + S quickly opens the Scribble tool, handy for faster access.
15. Can I lock a drawing so it doesn’t move?
Google Slides doesn’t let you lock elements directly, but here’s a trick: create your drawing in Google Drawings, save it as an image, and set it as your slide background. That’ll keep it firmly in place!
16. What’s the best way to draw shapes like arrows or flowcharts?
Use Insert > Shape for arrows, rectangles, circles, and more. Combine them with connectors to build flowcharts or diagrams neatly.
17. Can I draw collaboratively in Google Slides?
Yes! If others have editing access, they can draw or add annotations right along with you, great for team brainstorming sessions.